Want to Build a Shopify App? Here’s What You Should Know
Here's everything I've learned from building my first Shopify app. It's harder than you think.


Recently I decided I wanted to build a plugin or an app for an existing platform. I'd been using Shopify for over a year already, so it was a no-brainer which platform it should be.
I'd never built a Shopify app before, but now that I've left my job and have more time, I spent a week building a small Shopify app and released it on the App Store. Mainly, I just wanted to see what it would take.
I'm going to share my whole experience, but here's what you can expect:
- Everything that I've learned building the app;
- What it took to get it reviewed and published on the App Store;
- Pros and cons as I see them;
- My resources and recommendations.
If you're at least somewhat interested in building Shopify apps - this article is a must-read.
What was the app?
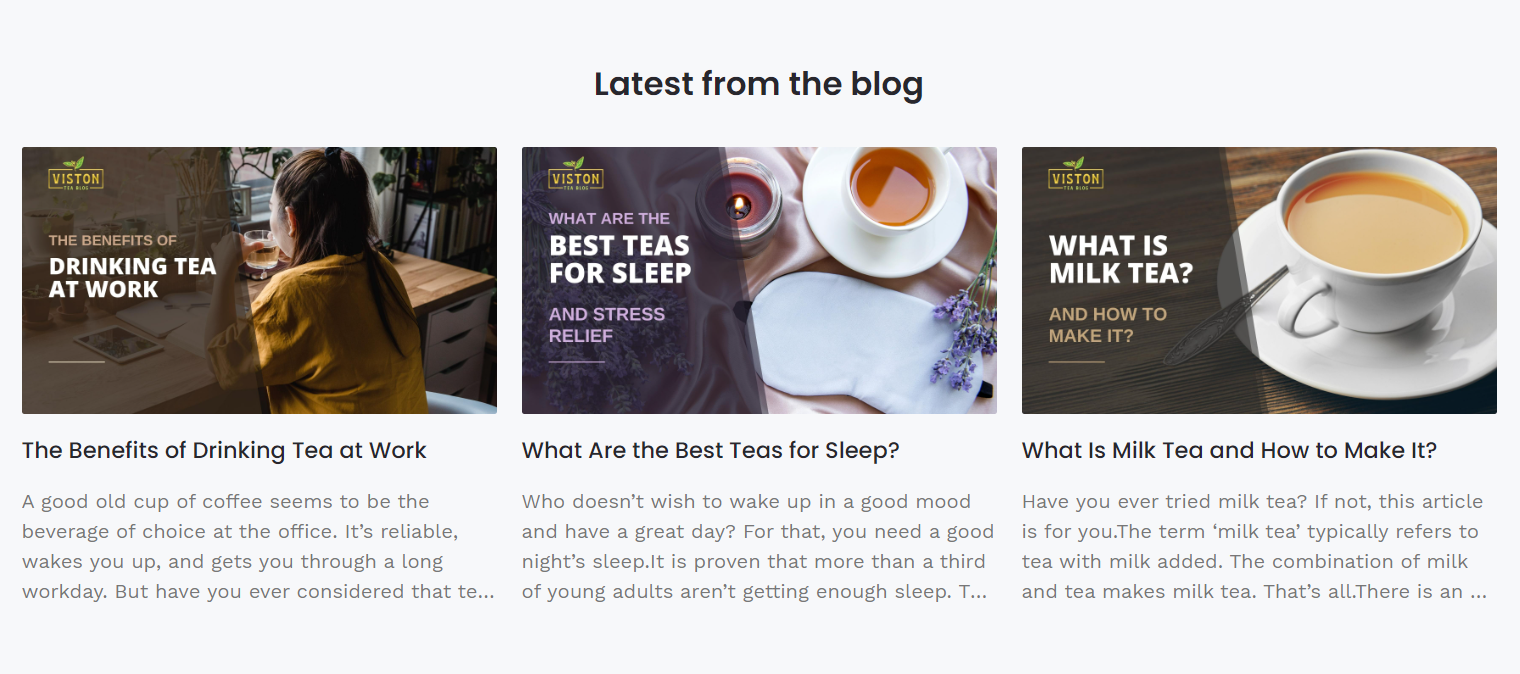
Over the last year, I was running a tea shop on Shopify and a tea blog on WordPress. I wanted to show a section on my shop's homepage with the latest blog posts.
Unfortunately, there was no good way to do that out of the box. The only app that solved this charged $5/month that I didn't want to pay, and wasn't exactly what I wanted anyway.
So I decided to build an app to pull the latest WordPress posts and integrate them with the Shopify theme editor.
If you're interested in checking it out on the app store, here it is 👇

Now let's dive into how I built it.
Setting up the app
I followed the official "getting started" guide to bootstrap an example JavaScript application with Shopify CLI. It was just a matter of running:
npm init @shopify/app@latestFor local development, you need to set up ngrok and then Shopify CLI automatically updates the URLs in the app settings that are used to install the app into your store.
What you end up with is a demo app that populates products and shows how many there are. It includes authentication, a basic backend server, and an embedded React app that uses their UI library Polaris.
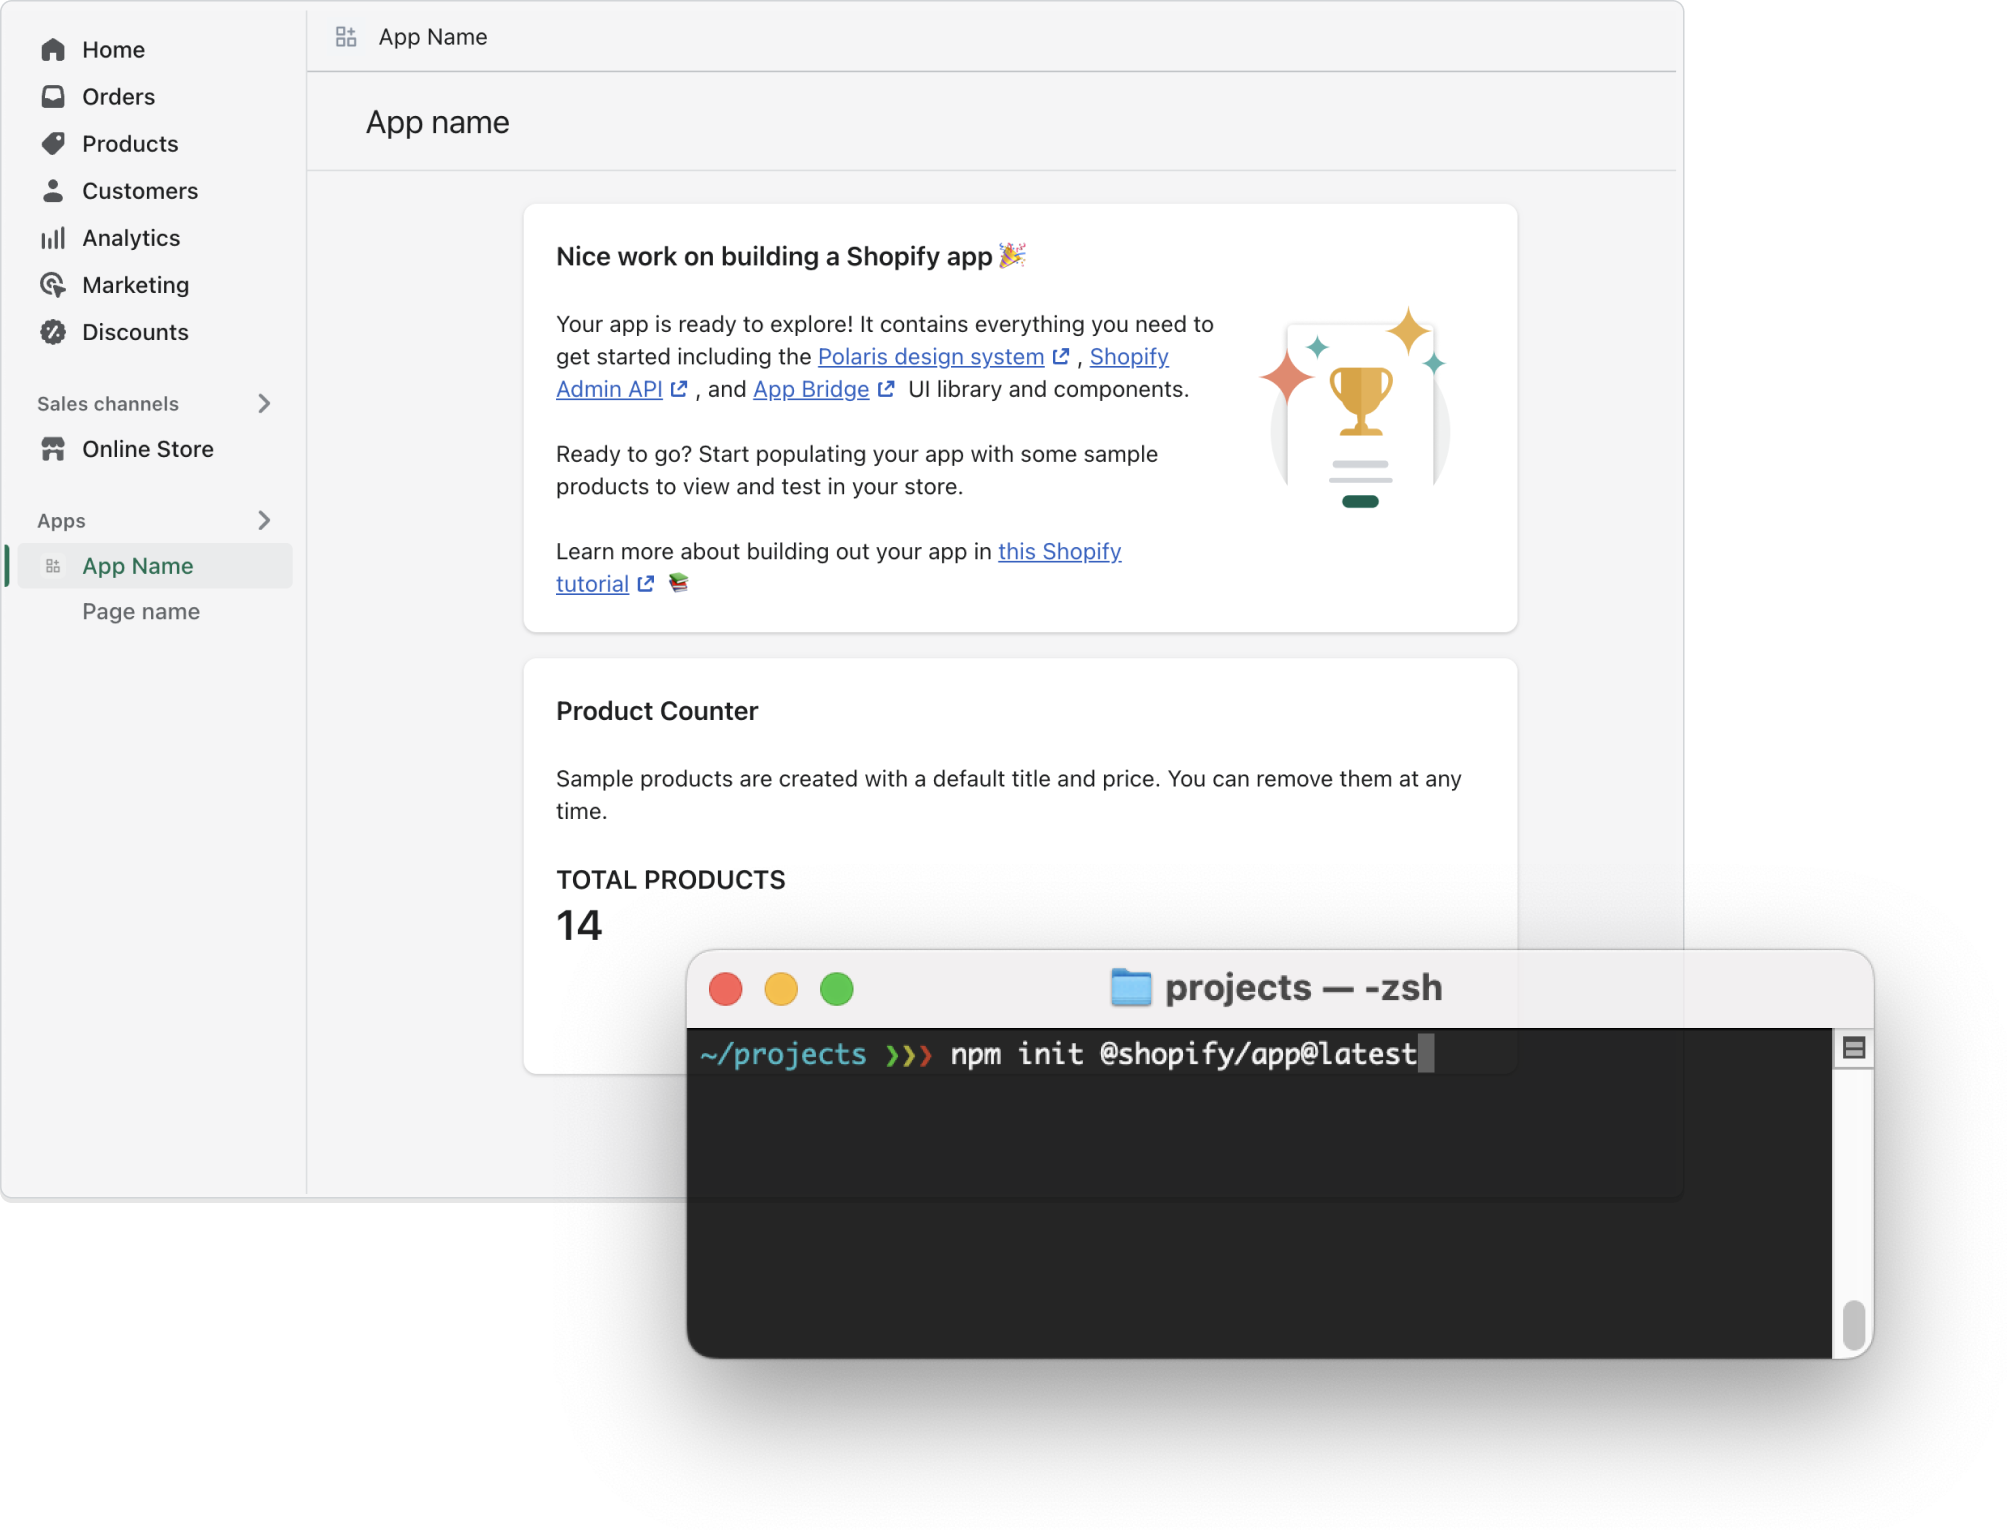
I didn't need to do any wiring up myself, but I deleted whatever files and code from the demo app I didn't need.
Adding theme extensions
What didn't come with the demo was the theme extensions.
There are two kinds of theme extensions - app blocks and app embed blocks:
App embed blocks are scripts that are global for the whole page, such as overlays or code snippets for analytics.
App blocks are page sections that shop owners can add through the theme editor.
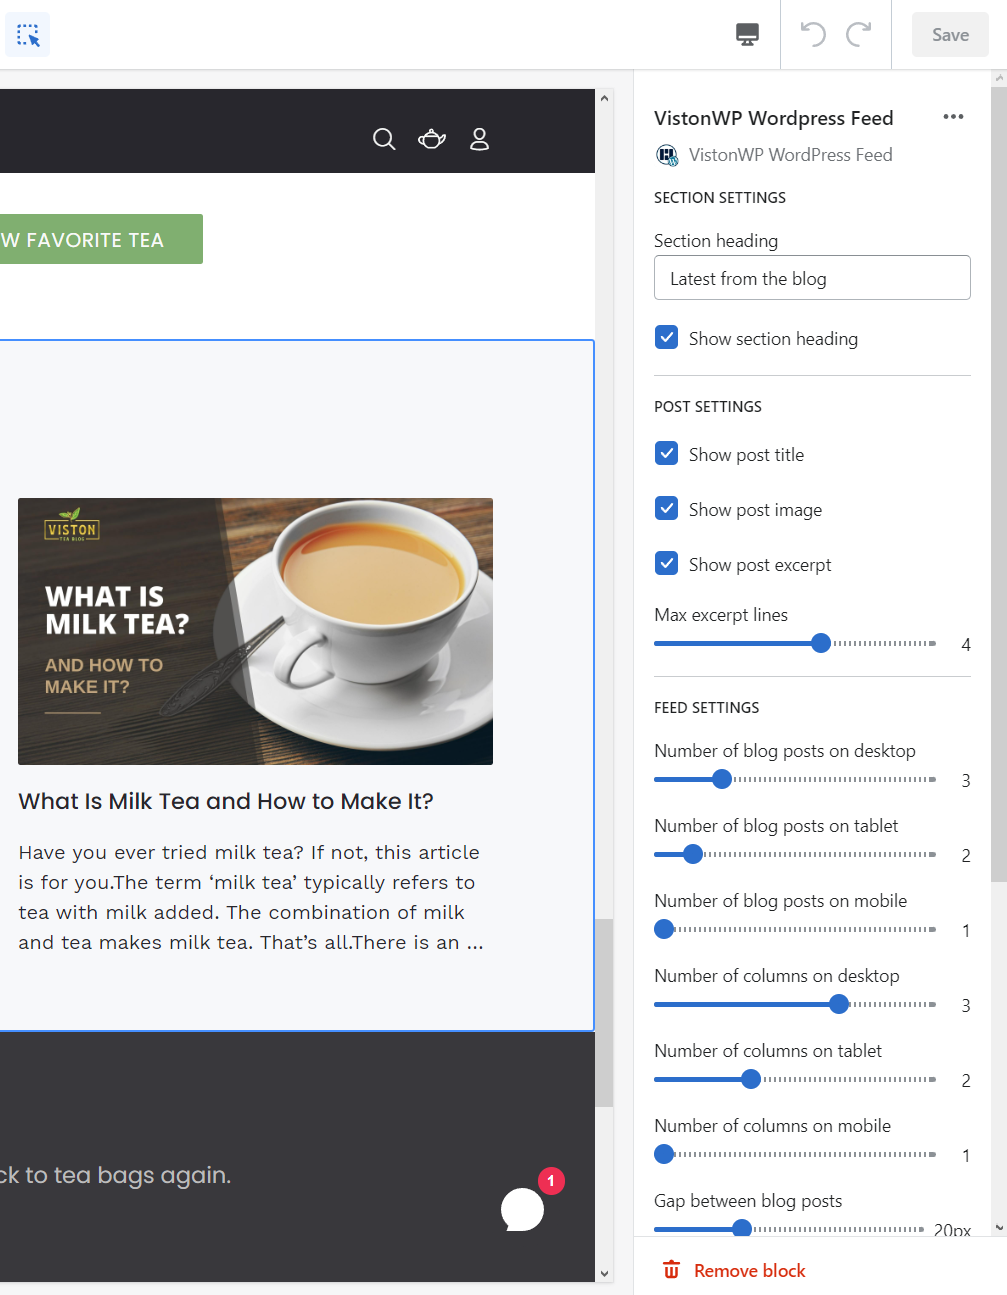
I wanted to create an app block merchants could use to add a section with the latest articles. If you're not familiar with Shopify's theme editor, here's what I'm talking about:
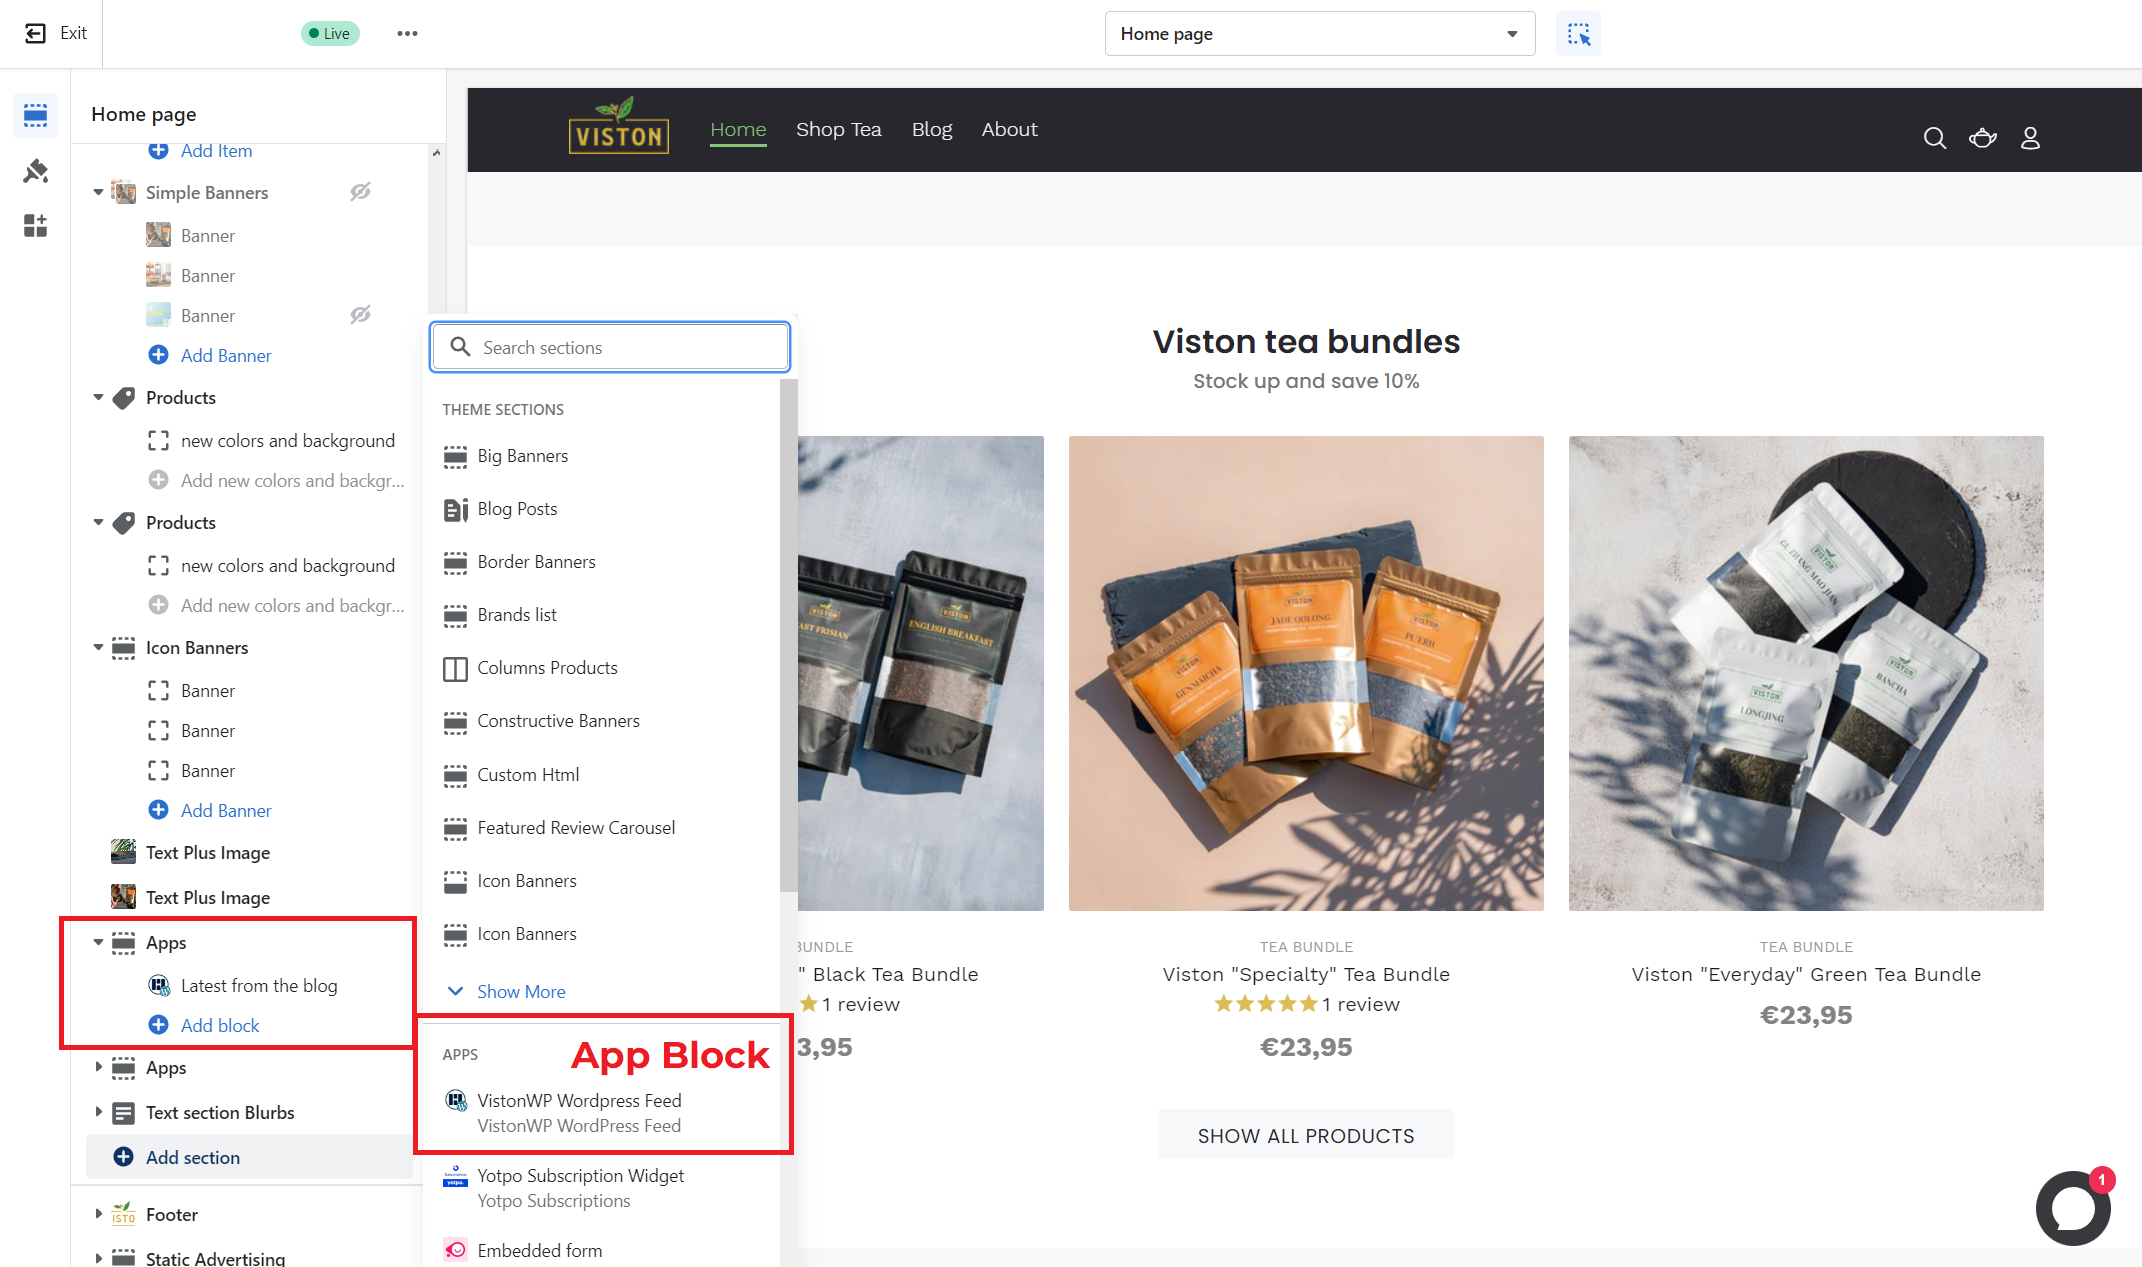
Each app block can define settings that alter the appearance, and even behavior of the app:
I created a new theme extension by following the docs and running a CLI command:
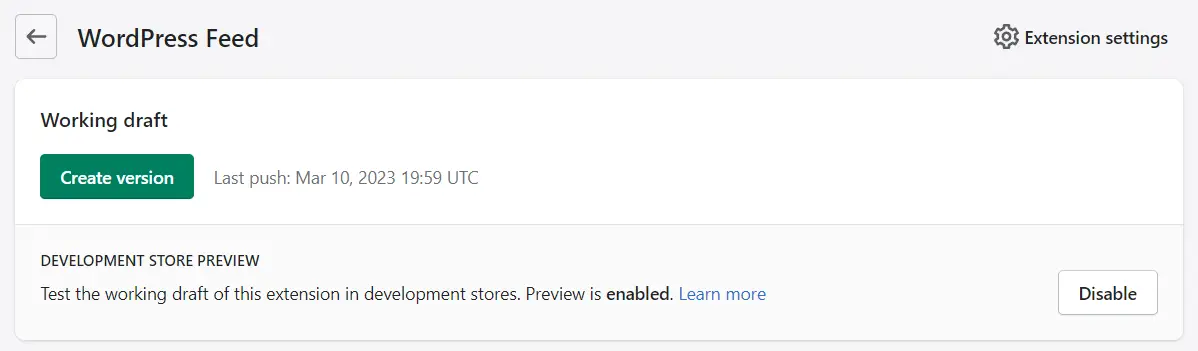
npm run shopify app generate extensionOnce you start your app in development by running npm run dev you'll get a link to the extension settings where you'll need to create a new version. It will be a draft at first, but you can later publish it.
In the same window, you need to enable development store previews:
Liquid templates
I wasn't familiar with liquid - the templating language from Shopify, but it was very easy to pick up and I didn't need to do anything fancy anyway. I created a new file blocks/wp-feed.liquid to start with.
Theme extensions must define a schema and some markup, like this:
<div id="wp-feed-app">
  My app section contents.
</div>

{% schema %}
{
  "name": "Wordpress Feed",
  "target": "section",
  "stylesheet": "wp-feed.css",
  "javascript": "wp-feed.js",
  "settings": [
    { "label": "Section heading", "id": "heading", "type": "text" },
    { "label": "Show section heading", "id": "show_heading", "type": "checkbox", "default": true },
    {
      "type": "range",
      "id": "num_excerpt_lines",
      "min": 1,
      "max": 6,
      "step": 1,
      "label": "Max excerpt lines",
      "default": 3
    },
    {
      "label": "Blog URL",
      "id": "url",
      "type": "url",
      "info": "Overrides the global URL setting for this feed only."
    },
  ]
}
{% endschema %}
The schema defines:
- The app name to show in the editor,
- The target which is always
sectionfor app blocks, - The settings to show in the theme editor,
- Links to your JavaScript and CSS files.
Here's an example of how I used the settings in my templates:
<div
  id="wp-feed-app"
  class="wp-feed-app_section"
>
  {% if block.settings.show_heading %}
    <div
      class="wp-feed-app_heading-wrapper"
    >
      <h2 class="wp-feed-app_heading h1">
        {{ block.settings.heading }}
      </h2>
    </div>
  {% endif %}

  <div id="wp-feed-app_feed" class="wp-feed-app_feed">
    {% # injected: dynamically generated articles %}
  </div>
</div>

{% # ...schema... %}Now I had to fetch the WordPress articles to create a feed.
Fetching WordPress posts
WordPress has a headless API that you can access. Basically, you can issue a GET request to /wp-json on any WordPress blog, slap on some filters, and it will return a JSON response with posts.
In my case, it was similar to this one:
/wp-json/wp/v2/posts?_embed&_fields=title,link,excerpt,featured_media,_embedded,_links&order=desc&per_page=3Now I needed to figure out how to call this API from my app block.
First, I created a new file assets/wp-feed.js. Remember the line "javascript": "wp-feed.js" in the schema? This is the file.
Now there's a small problem...
Accessing settings in JavaScript files
Shopify will host your assets on its CDN and will add a single <script> tag across all instances of this app block. This means that the file isn't generated on the server and doesn't have access to app block settings.
This causes problems because I need to access the blog URL and the number of blog posts to fetch. I came up with this solution:
<div
  id="wp-feed-app"
  data-url="{{ block.settings.url }}"
  class="wp-feed-app_section"
>
  ...
</div>data attributes for settingsI set a data-url attribute on the root element of my app block and then in my JavaScript code I can access it like this:
(() => {
  const rootEl = document.getElementById('wp-feed-app');
  const url = rootEl.getAttribute('data-url')?.replace(/\/$/, '') || '';
})();Now I simply used natively-available fetch function to get the latest posts in the app block. Here's the end result:
function getPostFromJson(post) {
  const {
    link,
    title: { rendered: title },
    excerpt: { rendered: excerpt },
    featured_media: mediaId,
    _embedded: { 'wp:featuredmedia': allMedia },
  } = post;

  const image = allMedia.find((media) => media.id === mediaId);

  return {
    link,
    title,
    excerpt,
    image,
  };
}

async function fetchPosts() {
  return fetch(
    `${url}/wp-json/wp/v2/posts?_embed&_fields=title,link,excerpt,featured_media,_embedded,_links&order=desc&per_page=${numPosts}`,
    {
      method: 'GET',
      headers: {
        'Content-Type': 'application/json',
      },
    }
  )
    .then((data) => data.json())
    .then((posts) => posts.map(getPostFromJson));
}Rendering articles
App block scripts should be as light as possible and shouldn't needlessly introduce 3rd party libraries. Every extra byte adds to the load time of the store, and time is money.
I needed to render the articles, but it had to be plain JS, I couldn't create a React component.
Lately, I've been reading an interesting book called "Frameworkless Front-End Development: Do You Control Your Dependencies Or Are They Controlling You?" and it seemed like I could use its advice here.
The HTML template tag
The closest you can get to reusable components in plain HTML are template tags.
They can contain any HTML code you want, and they go through the same processing as regular HTML code, but their contents are never rendered on the screen. Here's what I ended up with:
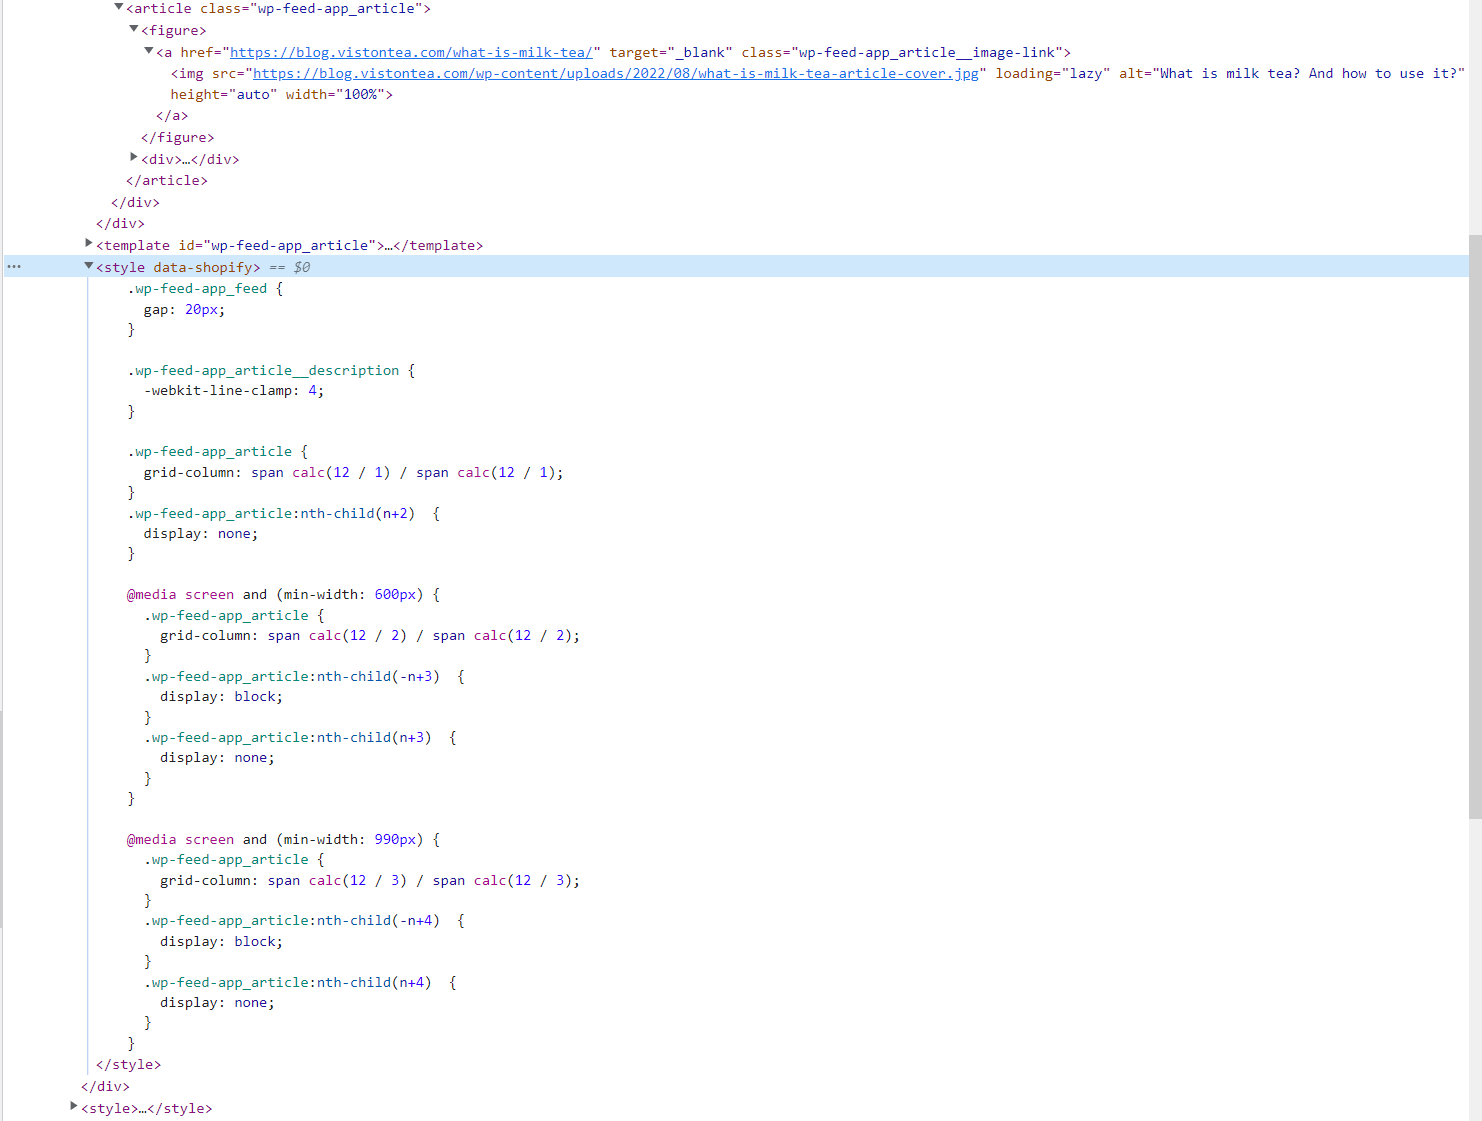
<template id="wp-feed-app_article">
  <article class="wp-feed-app_article">
    {% if block.settings.show_image %}
      <figure>
        <a href="{% # injected: post url %}" target="_blank" class="wp-feed-app_article__image-link">
          <img
            src="{% # injected: image url %}"
            loading="lazy"
            alt="{% # injected: image alt text %}"
            height="200"
            width="200"
          >
        </a>
      </figure>
    {% endif %}
    <div>
      {% if block.settings.show_title %}
        <h3 class="wp-feed-app_article__title">
          <a href="{% # injected: post url %}" about="_blank" class="wp-feed-app_article__title-link">
            {% # injected: post title %}
          </a>
        </h3>
      {% endif %}

      {% if block.settings.show_excerpt %}
        <p class="wp-feed-app_article__description">
          {% # injected: post excerpt %}
        </p>
      {% endif %}
    </div>
  </article>
</template>'If the contents aren't rendered, how is this helpful?' You might ask.
Well, we can use JavaScript to clone the contents of the template into virtual DOM, update the bits we need and then append them to a DOM element to render it. Here's what I mean:
let template; // To only need to query once, but it's optional.

function clonePostTemplate() {
  if (!template) {
    template = document.getElementById('wp-feed-app_article');
  }
  return template.content.firstElementChild.cloneNode(true);
}Once I had the element in vDOM, I updated the title, description, image, and the article URL:
function getPostElement(post) {
  const el = clonePostTemplate();

  const imageLinkEl = el.querySelector('.wp-feed-app_article__image-link');
  if (imageLinkEl) {
    imageLinkEl.setAttribute('href', post.link);
  }

  const titleLinkEl = el.querySelector('.wp-feed-app_article__title-link');
  if (titleLinkEl) {
    titleLinkEl.setAttribute('href', post.link);
    titleLinkEl.innerHTML = post.title;
    titleLinkEl.innerHTML = titleLinkEl.textContent.trim();
  }

  const descriptionEl = el.querySelector(
    '.wp-feed-app_article__description'
  );
  if (descriptionEl) {
    descriptionEl.innerHTML = post.excerpt;
    descriptionEl.innerHTML = descriptionEl.textContent.trim();
  }

  const imageEl = el.querySelector('img');
  if (imageEl) {
    imageEl.setAttribute('src', post.image.source_url);
    imageEl.setAttribute('alt', post.image.alt_text);
    imageEl.setAttribute('width', '100%');
    imageEl.setAttribute('height', 'auto');
  }

  return el;
}
It's not as sexy as passing in props to React components, but it gets the job done. The only thing left now is to actually render them on the screen:
const feedEl = document.getElementById('wp-feed-app_feed');

posts.map(getPostElement).forEach((element) => {
  feedEl.appendChild(element);
});
Image caveats
Shopify requires you to explicitly define image width and height, but I load the images dynamically, so I'd get this error:

I simply added random width and height:
<img
  src="{% # injected: image url %}"
  loading="lazy"
  alt="{% # injected: image alt text %}"
  height="200"
  width="200"
>
Then I reset them when I render the image:
imageEl.setAttribute('width', '100%');
imageEl.setAttribute('height', 'auto');
It is also a good idea to set loading="lazy" on the image, so it only starts loading the images when the user scrolls to them. Most browsers support this.
Style caveats
The assets/wp-feed.css file is a regular CSS file and there's nothing interesting about it. However, I wanted to let the user control the breakpoints for media queries because they may be different for every theme.
The problem is that the asset files come from CDN so I couldn't use liquid code in them. And it's not JavaScript, so the data-url workaround doesn't work.
Fortunately, there's a way to write CSS in the liquid templates using the {% style %} tag:
{% style %}
@media screen and (min-width: {{ block.settings.md_breakpoint }}px) {
  .wp-feed-app_article {
    grid-column: span calc(12 / {{ block.settings.num_cols_md }}) / span calc(12 / {{ block.settings.num_cols_md }});
  }
  .wp-feed-app_article:nth-child(-n+{{ grid_cols_md }})  {
    display: block;
  }
  .wp-feed-app_article:nth-child(n+{{ grid_cols_md }})  {
    display: none;
  }
}
{% endstyle %}
This CSS will be rendered on the server, so it may slow down the site if abused, but it's good enough in my case. I can embed the settings values and the CSS will come as an inline <style> tag in my HTML:
The admin app
The next step was to create an app that embeds into the admin panel. I didn't really need anything besides the app block, but apparently, you still have to create the admin app, even if it simply holds the setup instructions.
I decided it would be nice to at least allow setting the default blog URL globally then.
The layout
To build the user interface, I used the React components from the official Shopify design system Polaris. I used the Page component for the main container and added Layout with AnnotatedSections to mimic Shopify's own settings layout.
Here's a simplified version of what the layout code looked like:
<Page title="App Settings" divider>
<Frame>
<Layout>
<Layout.AnnotatedSection
id="storeDetails"
title="Global settings"
description="These settings will by default be used across all App Blocks in your theme."
>
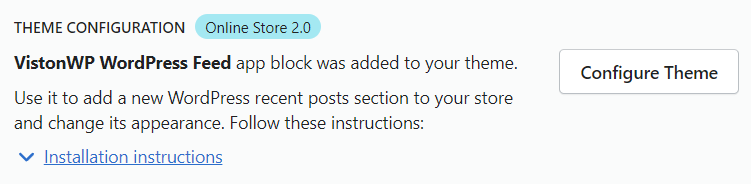
<LegacyCard>
<LegacyCard.Section>
<TextField
label="WordPress blog URL"
type="url"
placeholder="e.g. https://blog.myshopifystore.com"
/>
</LegacyCard.Section>
<LegacyCard.Section
title={
<Text variant="headingXs" as="h3">
THEME CONFIGURATION
</Text>
}
subdued
>
<Columns columns="1fr auto" gap="4">
<Text variant="bodyMd" as="p">
In the theme editor add an app section -{' '}
<em>Wordpress Feed</em>. <br /> You can also customize the
appearance there.
</Text>
<Button>Customize</Button>
</Columns>
</LegacyCard.Section>
</LegacyCard>
</Layout.AnnotatedSection>
</Layout>
</Frame>
</Page>After some back and forth with the reviewers later, I ended up with this final design:
Overall, there isn't anything particularly interesting in the layout code, but I enjoyed how quickly you can get good results if you use Shopify's design system, and I recommend you do the same if you build an embedded app.
Loading and saving the settings
The demo app came with a hook for making authenticated queries to the backend server, so I simply used it to fetch my settings. It's based on react-query:
const { data: appSettingsData, refetch } = useAppQuery({
  url: '/api/app-settings',
  reactQueryOptions: {
    onSuccess: (data) => {
      setUrlText(data.url);
      setUiState('idle');
    },
    onError: () => {
      setToastProps({
        content: 'There was an error loading app settings',
        error: true,
      });
    },
    select: (data) => ({
      ...data,
      url: data.url ?? '',
    }),
  },
});
I also kept it simple for saving the settings and used the native fetch API:
const handleClickSave = async () => {
  setUiState('saving');
  const response = await fetch('/api/app-settings', {
    method: 'PUT',
    headers: {
      'Content-Type': 'application/json',
    },
    body: JSON.stringify({
      url: urlText,
    }),
  });

  await refetch();

  if (response.ok) {
    setToastProps({
      content: 'App settings were saved successfully',
    });
  } else {
    setToastProps({
      content: 'There was an error saving app settings',
      error: true,
    });
  }

  setUiState('idle');
};
The toasts were already set up in the example app, so I reused those, and to manage my loading states I simply added some local state:
const [uiState, setUiState] = useState('loading'); // loading | idle | savingWhile the settings were loading I would show a skeleton instead of an input field:
{uiState === 'loading' ? (
  <SkeletonBodyText />
) : (
  <TextField
    label="WordPress blog URL"
    type="url"
    value={urlText ?? ''}
    onChange={handleChangeUrl}
    placeholder="e.g. https://blog.myshopifystore.com"
  />
)}
Also, I needed a button to save the settings, and Polaris, conveniently, had a ContextualSaveBar I could toggle when the URL in the input field didn't match the one that came from the backend query:
{hasUnsavedChanges && (
  <ContextualSaveBar
    alignContentFlush
    message="Unsaved changes"
    saveAction={{
      onAction: handleClickSave,
      loading: uiState === 'saving',
    }}
    discardAction={{
      onAction: handleClickDismiss,
    }}
  />
)}
Redirecting to the current theme
As I was researching existing apps that solved my problem, I saw some apps had a button that opened the theme editor for the current theme. I wanted that as well. It was trickier to add than I thought.
The Shopify docs are a bit... hmm... verbose. That's fine, but it makes it hard to find something specific when you're not sure what exactly you're looking for.
I did some reverse engineering, by inspecting another app's minified source code to find this line:
window.open("https://".concat(u, "/admin/themes/").concat(p, "/editor"), "_blank")I searched the docs for /admin/themes/ and found this hidden deep in some deprecated API reference:
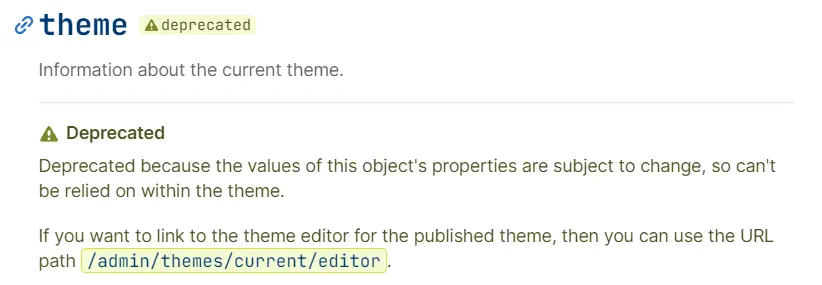
/admin/themes/current/editor.Now the question was how to redirect the user to this URL.
Apparently, Shopify's app bridge uses redux under the hood and exposes the dispatch method and some action creators. I ended up implementing the redirect like this:
import { useAppBridge } from '@shopify/app-bridge-react';
import { toAdminPath } from '@shopify/app-bridge/actions/Navigation/Redirect';

export default function HomePage() {
  const app = useAppBridge();

  const handleClickCustomize = () => {
    app.dispatch(
      toAdminPath({
        path: '/admin/themes/current/editor',
        newContext: true,
      })
    );
  };

  // ...
}The backend server
The example app came with an ExpressJS server with authentication already wired up. I left the authentication in place and removed all other endpoints.
I added the two new endpoints I needed:
app.put('/api/app-settings', async (req, res) => {
  // ...
});

app.get('/api/app-settings', async (req, res) => {
  // ...
});
I really didn't want to set up a database just to store the blog URL, so I looked for a way to do it using the Shopify API. I found that every app can store some metafields through a GraphQL API.
To get and set the metafields I had to query my app installation:
const APP_DATA_QUERY = `
  query GetAppData($namespace: String, $key: String!) {
    currentAppInstallation {
      id
      metafield(namespace: $namespace, key: $key) {
        id
        key
        value
        namespace
      }
    }
  }
`;

const session = res.locals.shopify.session;
const client = new shopify.api.clients.Graphql({ session });

const currentAppInstallation = await client
  .query({
    data: {
      query: APP_DATA_QUERY,
      variables: {
        namespace: 'app_settings',
        key: 'blog_url',
      },
    },
  })
.then(({ body }) => body.data.currentAppInstallation);This is enough for the GET endpoint and I can return the metafield value:
res.status(200).send({ url: currentAppInstallation.metafield?.value });For the PUT endpoint, I need to update the existing value:
const SET_METAFIELD_MUTATION = `
    mutation CreateAppDataMetafield($metafieldsSetInput: [MetafieldsSetInput!]!) {
      metafieldsSet(metafields: $metafieldsSetInput) {
        metafields {
          id
          key
          value
          namespace
        }
      }
    }
  `;

await client.query({
  data: {
    query: SET_METAFIELD_MUTATION,
    variables: {
      metafieldsSetInput: [
        {
          namespace: 'app_settings',
          key: 'blog_url',
          type: 'single_line_text_field',
          value: url,
          // 👇 Here's why I had to query the app installation previously
          ownerId: currentAppInstallation.id,
        },
      ],
    },
  },
});url is empty or null I called the metafieldDelete mutation instead.This was enough to have a working backend server.
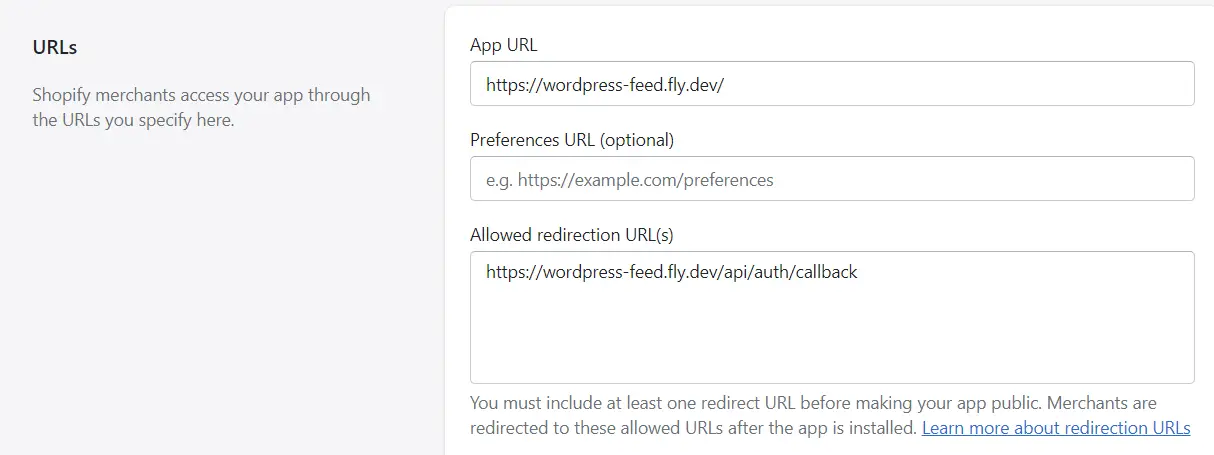
Deployment
The deployment was fairly straightforward. I simply followed the instructions for deployment on fly.io. The only confusing bit is that API docs use the term API key, and in the app settings, it's client id.
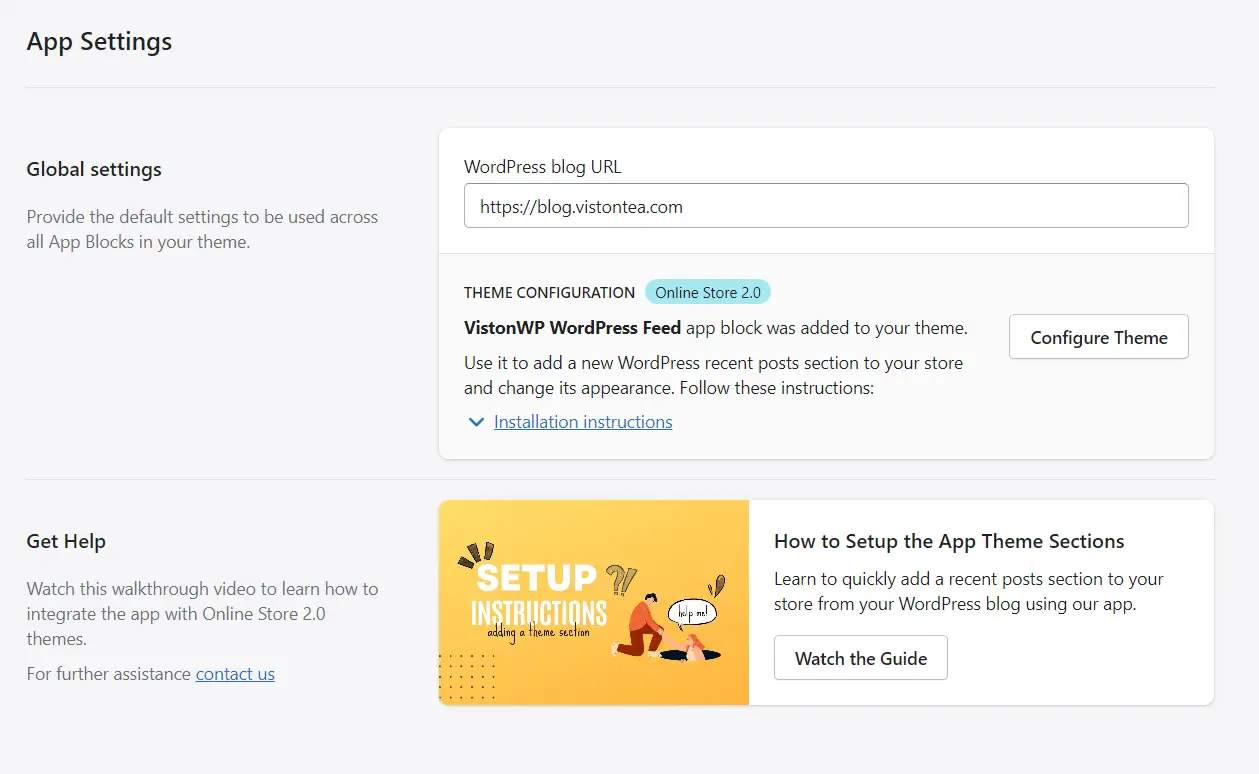
I also had to make sure to update the API routes to point to the deployed version:
Submitting to the app store
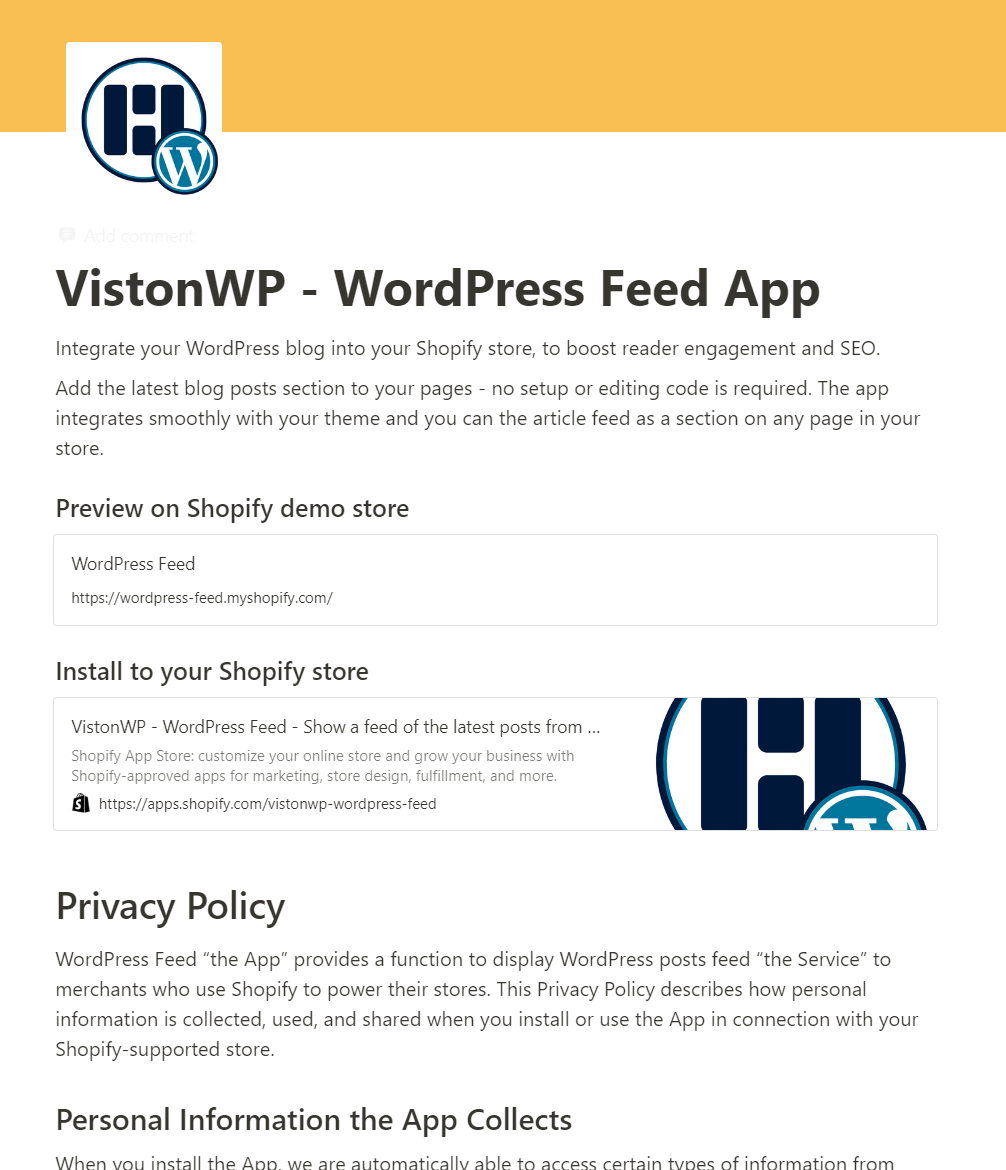
It took me a whole day just to fill in the forms for review and create the app store page. The form is huge, but not complicated.
I wrote the description, outlined the features, and created the visuals in Canva. The most annoying part was that I had to set up a privacy policy page.
My solution was to simply create a page on Notion, copy the privacy policy from some other app and adjust it a little:
Pitfalls
I got rejected from the store twice, here's what you should know if you want to avoid my mistakes.
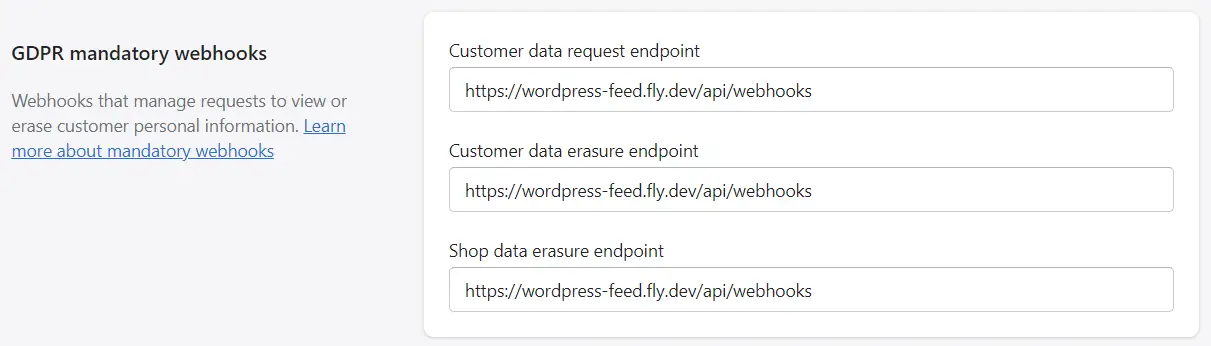
GDPR webhooks
My app doesn't manage any user data, so I ignored this requirement. Turns out you still need to host the webhooks:
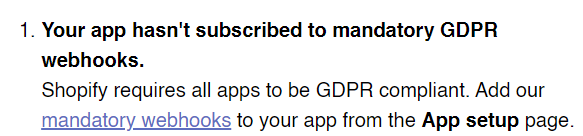
Luckily, the demo app had them set up, and I simply needed to add the URLs to the app settings:
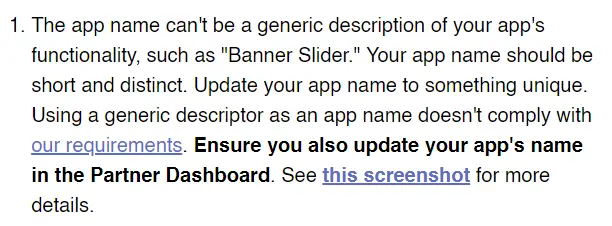
No generic name
I didn't care about building a brand, so I initially named the app WordPress Feed. Turns out you must come up with a name no matter what:
Screenshot requirements
The screenshots that you put on your store must not include a header for some reason:
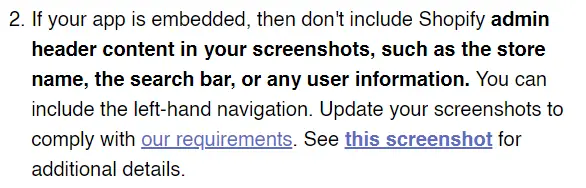
I just fixed it in Canva.
Add instructions for users
Shopify requires you to over-explain how to use your app in the app's UI:

I added a detailed guide on how to set up the app, basically teaching users how to use app blocks. Additionally, I recorded a short loom walkthrough video and added it to the UI:
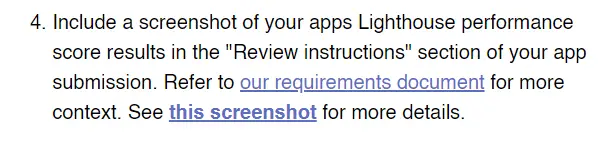
Lighthouse tests
There is nothing in the form itself that mentions lighthouse tests, so it's easy to miss this requirement. You need to run the tests in your devtools and calculate the impact on performance:
Final Thoughts
After a week of reviews, I finally got this message:
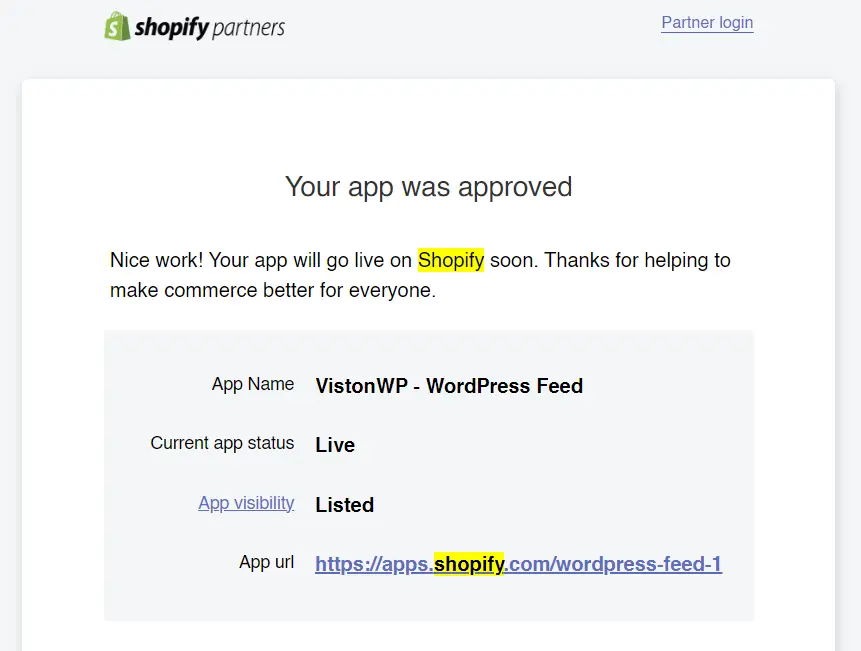
They were kind enough to update the app URL, and here it is now: https://apps.shopify.com/vistonwp-wordpress-feed
You might ask - is it worth building apps for Shopify?
For me, it was. I wanted to see the whole process and I also learned a lot. I also got to write about my experience 😉. Ultimately, it depends on what you want to get out of it. Here are the pros/cons as I see them to help you decide for yourself:
Pros
- Low-friction way to learn full-stack development. You get to try building an embedded SPA, a backend server, build client-side scripts, work with templates, possibly interact with databases and help people in the process.
- Get to leverage an existing platform and tools. Building with Polaris was quick and the demo app had the framework already set up, so I could focus on building my app.
- Can monetize quite easily, if that's what you want.
- Built-in distribution channel through the marketplace, so you don't need to market your app as much.
Cons
- It costs $99 to submit your app for review.
- The review process was long and had a few pitfalls, even for my simple app.
- Limited flexibility in tooling. If you like what Shopify gives you, awesome, but if you want to use something else, like NextJS or another backend framework - you're on your own.
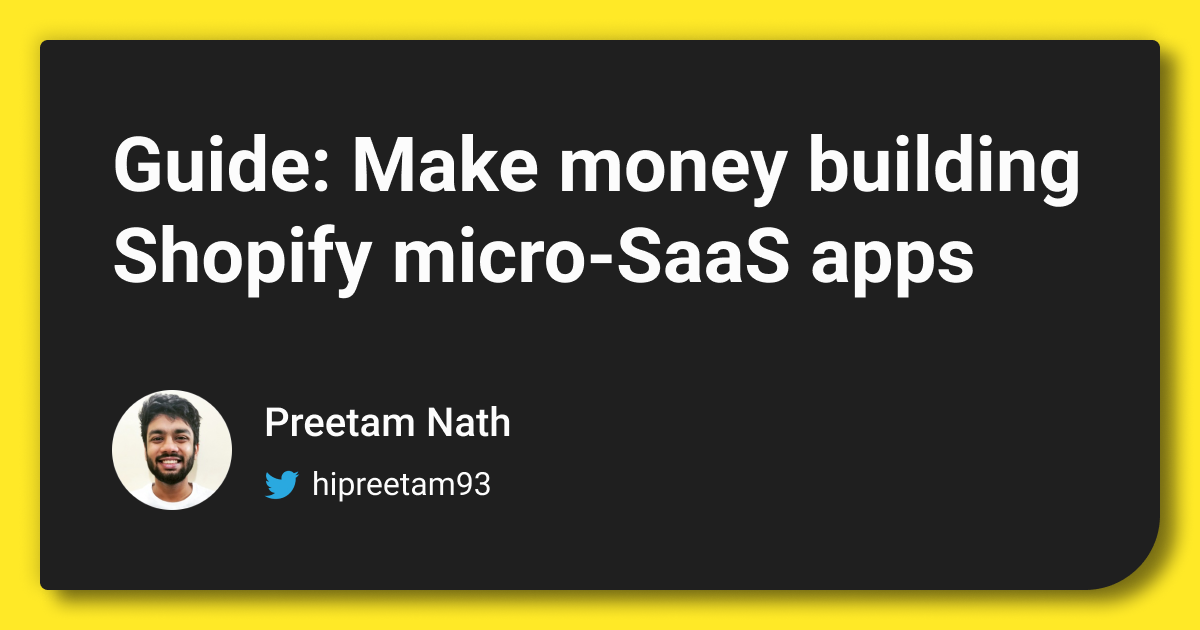
Resources
I researched very little on how to build Shopify apps but found an excellent blog written by Preetam Nath. If you're serious about building a Shopify app, I highly recommend reading his guide:

And that's it!
If you enjoyed this long post, let me know in the comments or on Twitter (DMs open), and feel free to share it!