Deploy a Remix+Drizzle Shopify App on Cloudflare Pages, D1 & KV
Step-by-step instructions for setting up a Shopify app to work with Cloudflare Pages infrastructure.


Cloudflare has become my go-to platform for hosting Remix and Next.js apps. It's affordable, offers a generous free tier, and has a strong brand. I use Remix to build a Shopify app, so hosting it on Cloudflare pages seemed like a natural fit.
However, there aren't many examples of how to deploy Shopify apps on Cloudflare, and relevant documentation is scarce, so it took me two days to integrate everything and get the local dev environment working smoothly.
These examples have been invaluable in helping me understand what needed to be done:
- https://github.com/cloudy9101/shopify-remix-cfpages
- https://github.com/rozenmd/d1-drizzle-remix-example
- https://github.com/dan-gamble/cloudflare-workers-remix-shopify
Instead of building another template that quickly becomes outdated, I will share my complete setup process step-by-step so you can understand it and adapt it yourself.
Why Use Cloudflare for Shopify Apps?
Cloudflare Pages offer serverless edge runtime, which lets you distribute your backend code close to your users without the initial cold start delay. This lets your app scale cost-efficiently while staying fast.
You will want to use a serverless database when you use edge functions. Otherwise, you're negating any gains from the edge functions. Cloudflare offers an SQLite-based solution for that called D1 Database, which is currently in public beta.
For storing Shopify sessions, we can use Cloudflare Workers KV, a key-value store that caches data on Cloudflare's CDN, ensuring extremely quick reads.
Cloudflare has everything we need to make a Shopify app super fast, and I love that everything is in a single place and uses a single CLI.
Step 0: Create a Partner Account and a Development Store
First, you'll need to sign up for a Shopify partner account if you don't already have one:


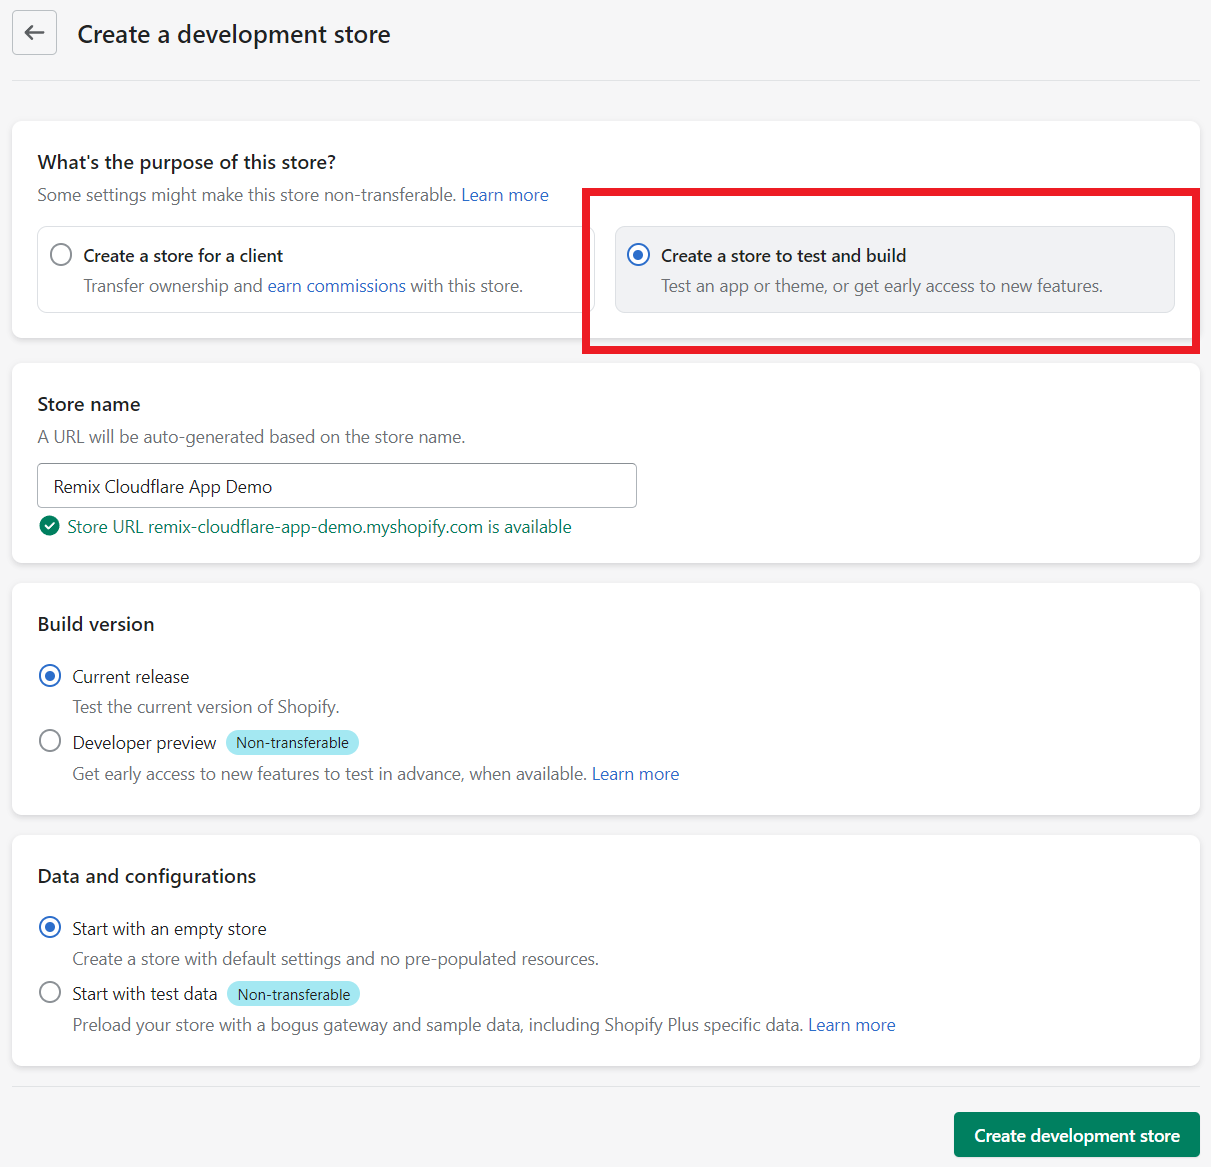
Then, you'll need to create a development store through your partner dashboard:
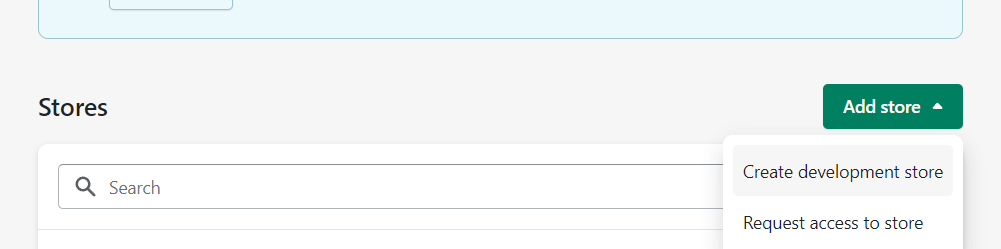
Just make sure you're creating a test store for an app:
Step 1: Initialize a Shopify App with Remix
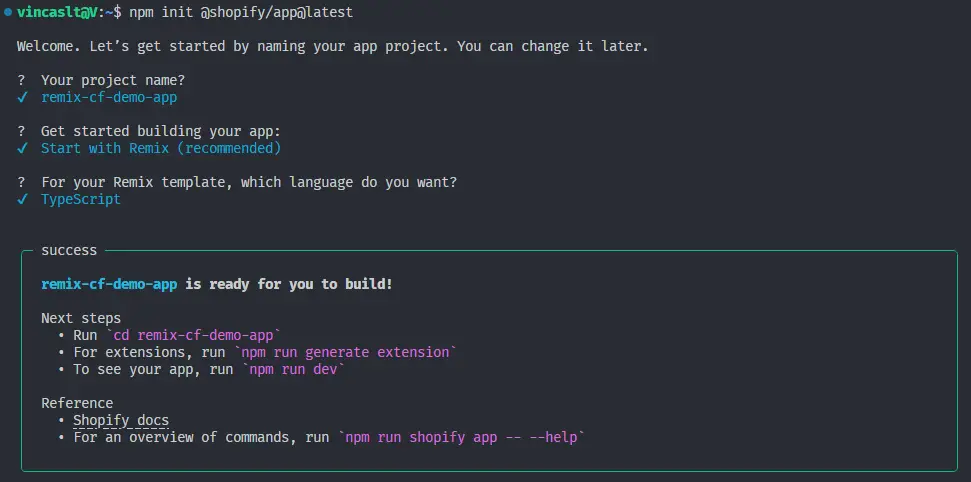
To set up the initial code, you must create a Shopify partner account and follow the steps in the Shopify documentation here: https://shopify.dev/docs/apps/getting-started/create.
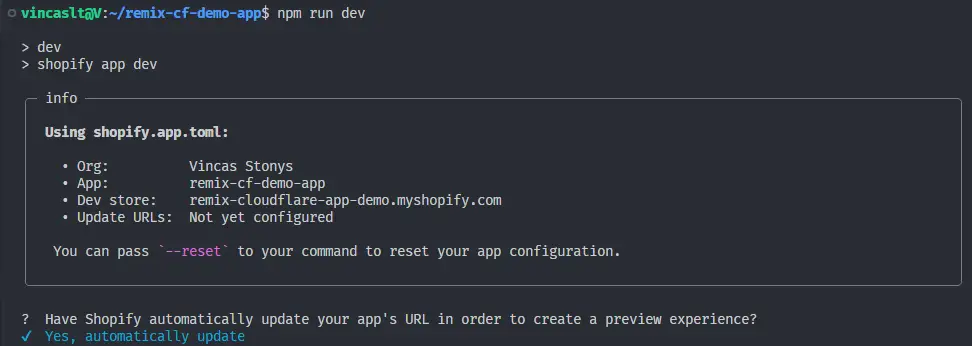
The CLI may ask you to authenticate first, but in the end, you should end up with your terminal looking like this:
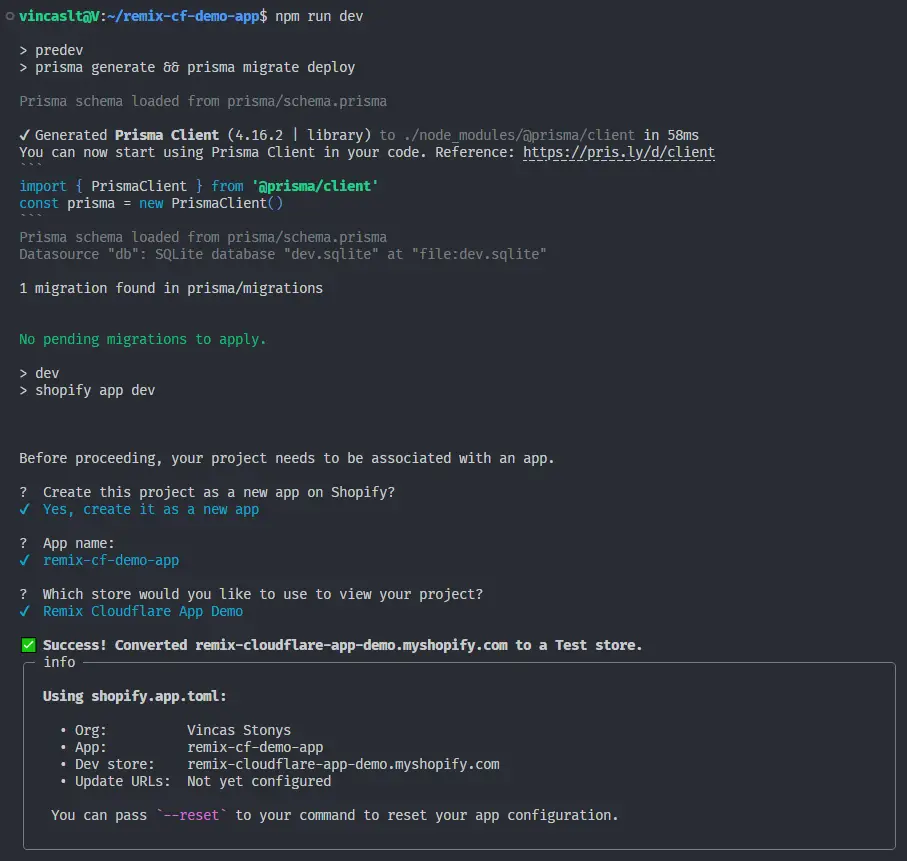
When you run npm run dev for the first time, you will be asked to create a new application and connect it to a development store:
Now quit the development server by pressing q or ctrl+c in your command line. We will customize the build tasks to use Cloudflare's Wrangler for local development.
Step 2: Update Config Files for Cloudflare
We had a choice of using either a Shopify CLI or Remix CLI to bootstrap our application. While the Remix CLI lets you generate the necessary configuration for hosting on Cloudflare, it doesn't bootstrap a Shopify app.
I think adding the Cloudflare configuration on top of a bootstrapped Shopify app is easier, and we can use the documentation and the Remix+Cloudflare Pages template to help us.
Install dependencies and update package.json
First, get the necessary Cloudflare dependencies from npm:
npm i @remix-run/cloudflare @remix-run/cloudflare-pages @shopify/shopify-app-session-storage-kv @remix-run/css-bundle
npm i -D @cloudflare/workers-types wrangler
Then, we need to add these to package.json:
{
  "engines": {
    "node": ">=18.0.0"
  },
  "sideEffects": false,
  "type": "module",
  ...
 }
These lines are required to run your app on Cloudflare Pages. Additionally, replace the start script with this:
"start": "wrangler pages dev ./public --live-reload --kv=SESSION",We will be using wrangler pages dev for local development and --kv=SESSION binds the local storage version of Cloudflare KV to the context.env.SESSION environment variable. We will make sure this binding is the same on prod later on.
Finally, feel free to delete predev, setup and prisma scripts, as we will be using Drizzle ORM instead of Prisma.
Update Typescript Configuration
We need to ensure our app is compatible with ESModules. Replace your tsconfig.json content with this code:
{
  "include": ["remix.env.d.ts", "**/*.ts", "**/*.tsx"],
  "compilerOptions": {
    "lib": ["DOM", "DOM.Iterable", "ES2022"],
    "strict": true,
    "skipLibCheck": true,
    "isolatedModules": true,
    "esModuleInterop": true,
    "removeComments": false,
    "resolveJsonModule": true,
    "forceConsistentCasingInFileNames": true,
    "noEmit": true,
    "allowJs": true,
    "jsx": "react-jsx",
    "moduleResolution": "Bundler",
    "target": "ES2022",
    "baseUrl": ".",
    "paths": {
      "~/*": ["./app/*"]
    },
    "types": ["node", "@shopify/app-bridge-types"]
  }
}
./tsconfig.jsonWe've changed the module resolution to Bundler instead of Node16, added esModuleInterop and bumped target and lib to ES2022.
We've also included remix.env.d.ts, but we haven't yet created it, so do that now in your root directory:
/// <reference types="@remix-run/dev" />
/// <reference types="@remix-run/cloudflare" />
/// <reference types="@cloudflare/workers-types" />
./remix.env.d.tsExtend the Remix server
Create a file called server.ts in your root directory with this code:
import { logDevReady } from "@remix-run/cloudflare";
import { createPagesFunctionHandler } from "@remix-run/cloudflare-pages";
import * as build from "@remix-run/dev/server-build";

if (process.env.NODE_ENV === "development") {
  logDevReady(build);
}

export const onRequest = createPagesFunctionHandler({
  build,
  getLoadContext: (context) => ({ env: context.env }),
  mode: build.mode,
});
./server.tsThe important bit is the getLoadContext line because it forwards the environment variables to our Remix loaders and actions.
We also need to update remix.config.js with a custom startup command to use wrangler pages dev for local development. Replace its contents with this:
import fs from "node:fs";

// Related: https://github.com/remix-run/remix/issues/2835#issuecomment-1144102176
// Replace the HOST env var with SHOPIFY_APP_URL so that it doesn't break the remix server. The CLI will eventually
// stop passing in HOST, so we can remove this workaround after the next major release.
if (
  process.env.HOST &&
  (!process.env.SHOPIFY_APP_URL ||
    process.env.SHOPIFY_APP_URL === process.env.HOST)
) {
  process.env.SHOPIFY_APP_URL = process.env.HOST;
  delete process.env.HOST;
}

// Binds env vars for local development with Cloudflare pages
if (process.env.NODE_ENV === "development") {
  fs.writeFileSync(
    ".dev.vars",
    `SHOPIFY_APP_URL=${process.env.SHOPIFY_APP_URL}\nSHOPIFY_API_KEY=${process.env.SHOPIFY_API_KEY}\nSHOPIFY_API_SECRET=${process.env.SHOPIFY_API_SECRET}\nSCOPES=${process.env.SCOPES}\n`,
  );
}

/** @type {import('@remix-run/dev').AppConfig} */
export default {
  ignoredRouteFiles: ["**/.*"],
  server: "./server.ts",
  appDirectory: "app",
  serverBuildPath: "functions/[[path]].js",
  serverConditions: ["workerd", "worker", "browser"],
  serverDependenciesToBundle: "all",
  serverMainFields: ["browser", "module", "main"],
  serverMinify: true,
  serverModuleFormat: "esm",
  serverPlatform: "neutral",
  dev: {
    command: `npm start -- --port=${process.env.PORT}`,
    manual: true,
    port: process.env.HMR_SERVER_PORT || 8002,
  },
  future: {},
};
./remix.config.jsA lot of the configuration settings come from the Cloudflare+Remix template: https://github.com/remix-run/remix/blob/main/templates/cloudflare-pages/remix.config.js. However, I've added a few important bits.
The shopify app dev command opens a tunnel to your local server, updates the app URL in your partner dashboard, and sets the new URL along with the API key, secret, and scope as environment variables.
The problem is that Cloudflare workers don't receive environment variables - they must be bound. This is done by adding them to .dev.vars file, and that's what the fs.writeFileSync line does - it writes the latest env variable values to the .dev.vars file every time the server is started.
Additionally, I've updated the command used by remix dev to call our npm start which uses Wrangler to start the local Cloudflare development environment on the port the Cloudflare tunnel expects.
Finally, because we use the ESModules, we need to change the syntax of the default export.
With this configuration, you will be able to start your server, and you'll see that it's using wrangler under the hood and it's being passed our environment variables as bindings:
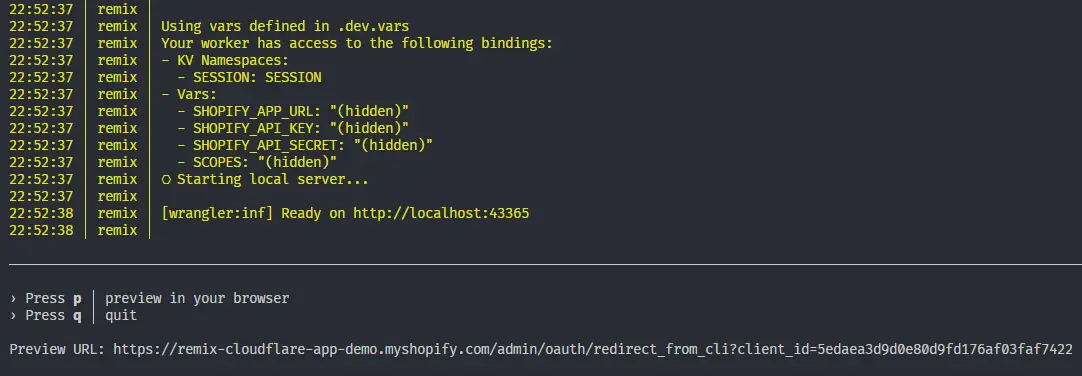
Don't worry if you're getting errors when starting your app. We still need to take care of the Shopify part, but this configuration will enable us to deploy and run our project on Cloudflare.
Step 3: Update Shopify Setup for Cloudflare
We don't have access to process.env anymore, but our Shopify configuration relies on it. We need to change that, so let's update the shopify.server.ts with this content:
import type { AppLoadContext } from "@remix-run/cloudflare";
import { restResources } from "@shopify/shopify-api/rest/admin/2023-10";
import {
  AppDistribution,
  DeliveryMethod,
  LATEST_API_VERSION,
  shopifyApp,
} from "@shopify/shopify-app-remix/server";
import { KVSessionStorage } from "@shopify/shopify-app-session-storage-kv";

declare module "@remix-run/cloudflare" {
  interface AppLoadContext {
    env: {
      SHOPIFY_API_KEY: string;
      SHOPIFY_API_SECRET: string;
      SHOPIFY_APP_URL: string;
      SCOPES: string;
      SHOP_CUSTOM_DOMAIN: string;
      SESSION: KVNamespace;
      DB: D1Database;
    };
  }
}

export const initShopify = (context: AppLoadContext) => {
  const shopify = shopifyApp({
    apiKey: context.env.SHOPIFY_API_KEY,
    apiSecretKey: context.env.SHOPIFY_API_SECRET || "",
    apiVersion: LATEST_API_VERSION,
    scopes: context.env.SCOPES?.split(","),
    appUrl: context.env.SHOPIFY_APP_URL || "",
    authPathPrefix: "/auth",
    sessionStorage: new KVSessionStorage(context.env.SESSION),
    distribution: AppDistribution.AppStore,
    restResources,
    webhooks: {
      APP_UNINSTALLED: {
        deliveryMethod: DeliveryMethod.Http,
        callbackUrl: "/webhooks",
      },
    },
    hooks: {
      afterAuth: async ({ session }) => {
        shopify.registerWebhooks({ session });
      },
    },
    future: {
      v3_webhookAdminContext: true,
      v3_authenticatePublic: true,
    },
    ...(context.env.SHOP_CUSTOM_DOMAIN
      ? { customShopDomains: [context.env.SHOP_CUSTOM_DOMAIN] }
      : {}),
  });

  return shopify;
};
./app/shopify.server.tsWe wrap our Shopify object in a function that receives a context with all our environment variables. We'll be calling this function from our loaders and actions.
Additionally, I've replaced the sessionStorage with KVSessionStorage and pass it the bound id of the key-value store namespace. The declare module "@remix-run/cloudflare" section helps us eliminate warnings due to the default context type being unknown.
Update the usages of Shopify
Now that we changed the shopify.server.ts file, any existing usages will break and need to be updated. Below are all of the changes you need to make.
In app/entry.server.tsx
Replace the contents with:
import type { AppLoadContext, EntryContext } from "@remix-run/cloudflare";
import { RemixServer } from "@remix-run/react";
import isbot from "isbot";
import { renderToReadableStream } from "react-dom/server";
import { initShopify } from "~/shopify.server";

export default async function handleRequest(
  request: Request,
  responseStatusCode: number,
  responseHeaders: Headers,
  remixContext: EntryContext,
  context: AppLoadContext,
) {
  const shopify = await initShopify(context);
  shopify.addDocumentResponseHeaders(request, responseHeaders);

  const body = await renderToReadableStream(
    <RemixServer context={remixContext} url={request.url} />,
    {
      signal: request.signal,
      onError(error: unknown) {
        // Log streaming rendering errors from inside the shell
        console.error(error);
        responseStatusCode = 500;
      },
    },
  );
  if (isbot(request.headers.get("user-agent"))) {
    await body.allReady;
  }

  responseHeaders.set("Content-Type", "text/html");
  return new Response(body, {
    headers: responseHeaders,
    status: responseStatusCode,
  });
}
./app/entry.server.tsxIt's mostly the same as in Remix+Cloudflare template, but I've updated the handleRequest to accept context as the last argument and pass it to initShopify.
In app/root.tsx
Add the code necessary for css bundling:
import type { LinksFunction } from "@remix-run/cloudflare";
import { cssBundleHref } from "@remix-run/css-bundle";

export const links: LinksFunction = () => [
  ...(cssBundleHref ? [{ rel: "stylesheet", href: cssBundleHref }] : []),
];

..../app/root.tsxIn app/routes/*
We'll follow this pattern to fix most of the issues in routes:
- Get the
authenticatemethod off of the Shopify object created with our new function. - Change the
nodeimports tocloudflareimports.
Do that in app/routes/auth.$.tsx:
import type { LoaderFunctionArgs } from "@remix-run/cloudflare";
import { initShopify } from "../shopify.server";

export const loader = async ({ request, context }: LoaderFunctionArgs) => {
  await initShopify(context).authenticate.admin(request);

  return null;
};
./app/routes/auth.$.tsxDo the same as above in app/routes/webhooks.tsx, but additionally remove the usage of db and instead remove session directly through shopify, or simply replace the contents with this:
import type { ActionFunctionArgs } from "@remix-run/cloudflare";
import { initShopify } from "../shopify.server";

export const action = async ({ request, context }: ActionFunctionArgs) => {
  const shopify = initShopify(context);
  const { topic, session, admin } = await shopify.authenticate.webhook(request);

  if (!admin) {
    // The admin context isn't returned if the webhook fired after a shop was uninstalled.
    throw new Response();
  }

  switch (topic) {
    case "APP_UNINSTALLED":
      if (session) {
        await shopify.sessionStorage.deleteSession(session.id);
      }

      break;
    case "CUSTOMERS_DATA_REQUEST":
    case "CUSTOMERS_REDACT":
    case "SHOP_REDACT":
    default:
      throw new Response("Unhandled webhook topic", { status: 404 });
  }

  throw new Response();
};./app/routes/webhooks.tsxDo similar changes in app/routes/app.tsx to fix the loader, making sure to change process.env to context.env:
import type {
  HeadersFunction,
  LoaderFunctionArgs,
} from "@remix-run/cloudflare";
import { json } from "@remix-run/cloudflare";
import { initShopify } from "../shopify.server";

export const loader = async ({ request, context }: LoaderFunctionArgs) => {
  await initShopify(context).authenticate.admin(request);

  return json({ apiKey: context.env.SHOPIFY_API_KEY || "" });
};

..../app/routes/app.tsxAnd similarly in app/routes/app._index.tsx to fix the loader and the action:
import type {
  ActionFunctionArgs,
  LoaderFunctionArgs,
} from "@remix-run/cloudflare";
import { json } from "@remix-run/cloudflare";
import { initShopify } from "../shopify.server";

export const loader = async ({ request, context }: LoaderFunctionArgs) => {
  await initShopify(context).authenticate.admin(request);

  return null;
};

export const action = async ({ request, context }: ActionFunctionArgs) => {
  const { admin } = await initShopify(context).authenticate.admin(request);
  ...
}/app/routes/app._index.tsxresponseJson is giving you type errors, just set it to any:const responseJson = await response.json<any>();Finally, fix the login by taking it from the result of initShopify and replacing node imports with cloudflare in app/routes/_index/route.tsx and app/routes/auth.login/route.tsx:
import type { LoaderFunctionArgs } from "@remix-run/cloudflare";
import { json, redirect } from "@remix-run/cloudflare";
import { initShopify } from "~/shopify.server";

export const loader = async ({ request, context }: LoaderFunctionArgs) => {
  ...
  const shopify = initShopify(context);
  return json({ showForm: Boolean(shopify.login) });
};./app/routes/_index/route.tsximport type {
ActionFunctionArgs,
LoaderFunctionArgs,
} from "@remix-run/cloudflare";
import { json } from "@remix-run/cloudflare";
import { initShopify } from "~/shopify.server";
export const loader = async ({ request, context }: LoaderFunctionArgs) => {
const errors = loginErrorMessage(await initShopify(context).login(request));
...
};
export const action = async ({ request, context }: ActionFunctionArgs) => {
const errors = loginErrorMessage(await initShopify(context).login(request));
...
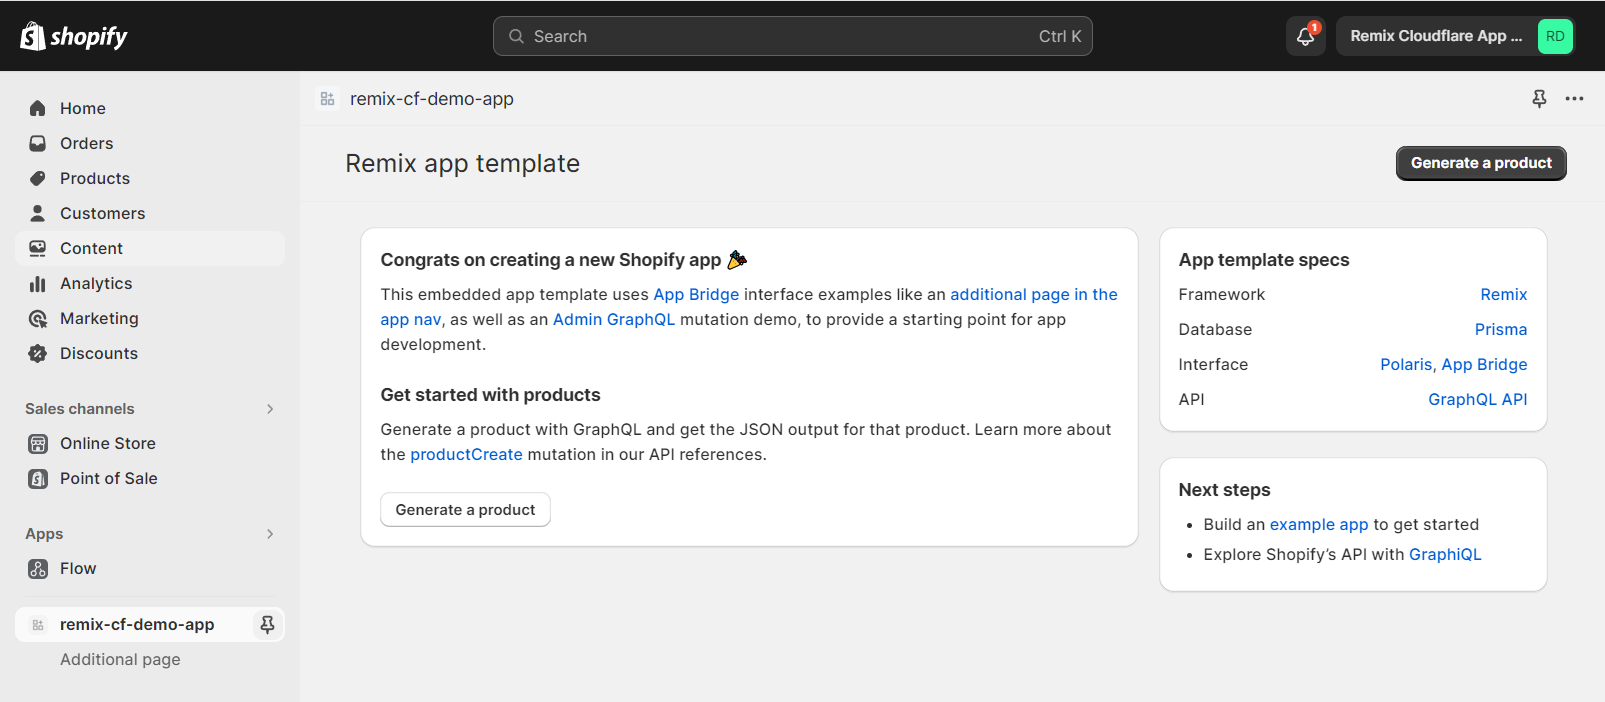
};./app/routes/auth.login/route.tsxNow, if you run npm run dev you should be able to visit the given preview URL, install your app, and see your app working:
Step 4: Using Drizzle with D1
First, we need to create a new D1 database using instructions in cloudflare docs:
npx wrangler d1 create dev-remix-cf-demodev or prod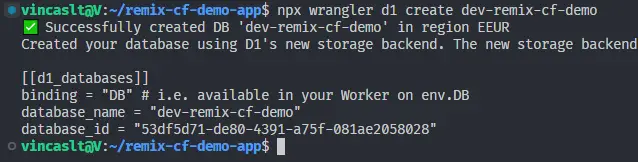
The CLI gives us credentials to use to connect to the database. We need to create a wrangler.toml config file in our root directory and paste them there (replace with your values):
compatibility_date = "2022-11-07"

[[d1_databases]]
binding = "DB"
database_name = "dev-remix-cf-demo"
database_id = "53df5d71-de80-4391-a75f-081ae2058028"
preview_database_id = "DB"./wrangler.tomlI've added two extra lines, compatibility_date so we don't need to pass it as CLI arguments and preview_database_id which must match our binding so that D1 works with the local version of Cloudflare Pages.
--remote to your wrangler command. More info here: https://developers.cloudflare.com/d1/learning/local-development/Add Drizzle ORM
We'll loosely follow instructions in drizzle docs. First, let's install the necessary packages:
npm i drizzle-orm
npm i -D drizzle-kit
Then, let's create a new folder drizzle in the root directory and create schema.ts file inside with some tables to test our setup with:
import { sqliteTable, text } from "drizzle-orm/sqlite-core";

export const test_table = sqliteTable("test_table", {
  test_data: text("test_data").notNull(),
});
./drizzle/schema.tsAnd we also need to create a config file for drizzle called drizzle.config.ts:
import type { Config } from "drizzle-kit";

export default {
  driver: "d1",
  schema: "./drizzle/schema.ts",
  out: "./drizzle/migrations",
} satisfies Config;
./drizzle.config.tsFinally, we need to create a way to access the database from our app, so let's modify the app/db.server.ts file:
import type { AppLoadContext } from "@remix-run/cloudflare";
import { drizzle } from "drizzle-orm/d1";

export function initDB(context: AppLoadContext) {
  return drizzle(context.env.DB);
}

export * as schema from "../drizzle/schema";
./app/db.server.tsYou'll notice that we use the same approach to get binding as we did with initShopify. I also like to re-export schema from this file so it's easier to access it in the app.
Using drizzle in the app
We can now test our setup by writing and reading some test data.
In app/routes/app._index.tsx let's insert some test data in the action and read it in the loader:
import { initDB, schema } from "~/db.server";

export const loader = async ({ request, context }: LoaderFunctionArgs) => {
  await initShopify(context).authenticate.admin(request);

  const test_data = await initDB(context)
    .select()
    .from(schema.test_table)
    .all();

  return json({ test_data });
};

export const action = async ({ request, context }: ActionFunctionArgs) => {
  const { admin } = await initShopify(context).authenticate.admin(request);
  await initDB(context)
    .insert(schema.test_table)
    .values({ test_data: "testing" });
  ...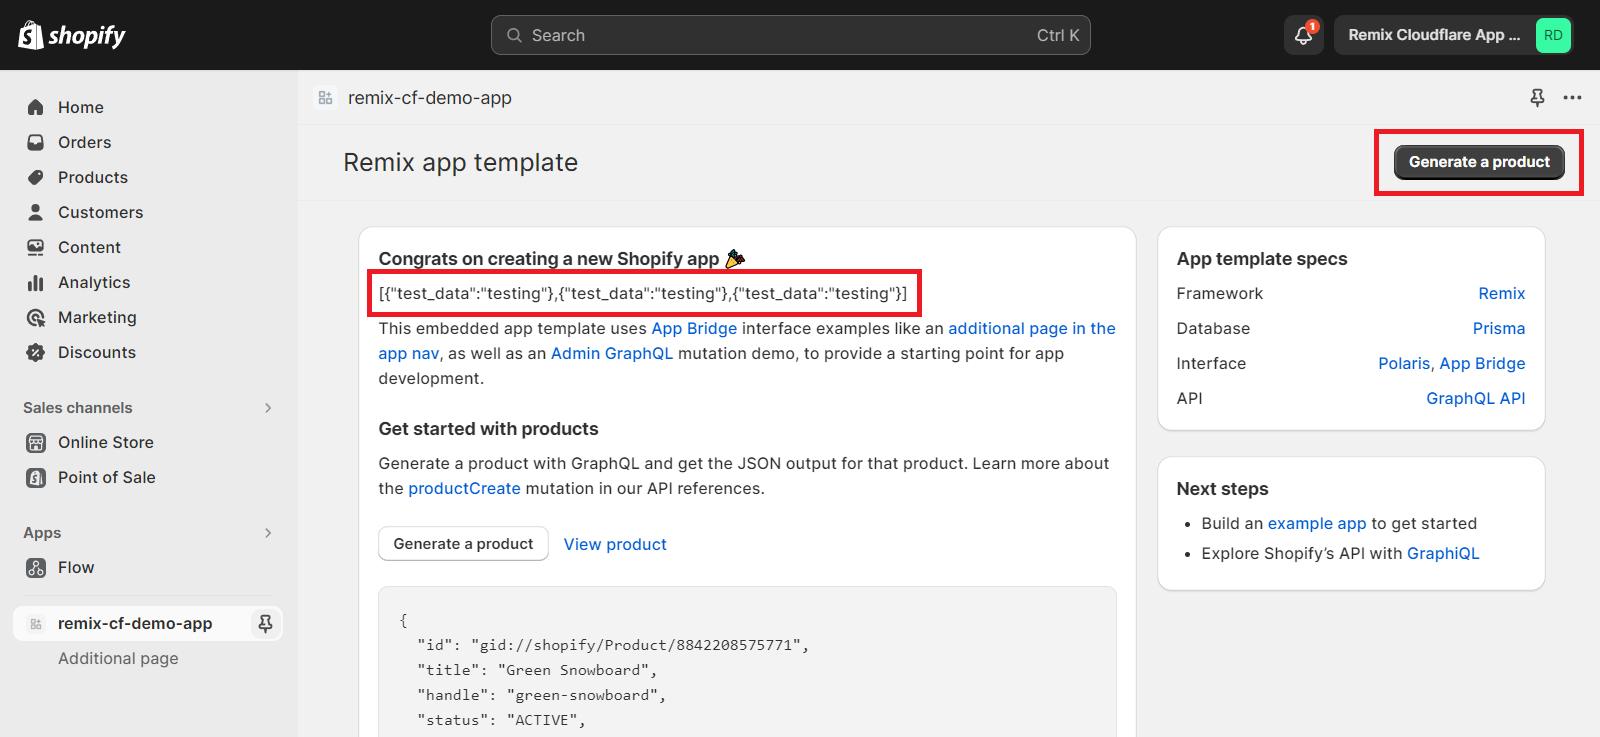
}./app/routes/app._index.tsxLet's output the test data somewhere we can see. Get the loader data at the top of the Index component and output the test_data somewhere on the page:
export default function Index() {
  const { test_data } = useLoaderData<typeof loader>();

  ...

  return (
    ...
    <Text as="h2" variant="headingMd">
      Congrats on creating a new Shopify app 🎉
    </Text>
    <Text as="p">{JSON.stringify(test_data)}</Text>
    ...
  );
}./app/routes/app._index.tsxBefore we test the app, we need to create the tables in the database. First, let's create the initial migration:
npx drizzle-kit generate:sqlite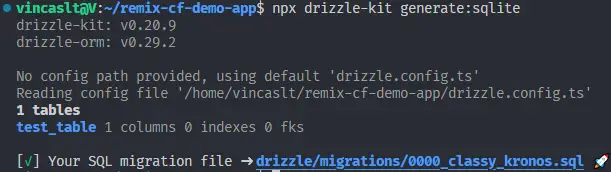
Note the migration name, and run the command to update the wrangler database:
npx wrangler d1 execute dev-remix-cf-demo --local --file=./drizzle/migrations/0000_classy_kronos.sql
Finally, let's run npm run dev to see our local database in action by clicking "Generate product."
shopify.app.toml the scopes are set to: scopes = "write_products". Afterwards run npm run shopify app config push.You should see new values appearing, and they'll still be available locally if you restart your application:
Step 5: Deploying Your Shopify App
We got the local dev environment working, but we still need to deploy the production application. This will involve deploying the database, configuring the KV store, and deploying the application itself.
Deploying the D1 database
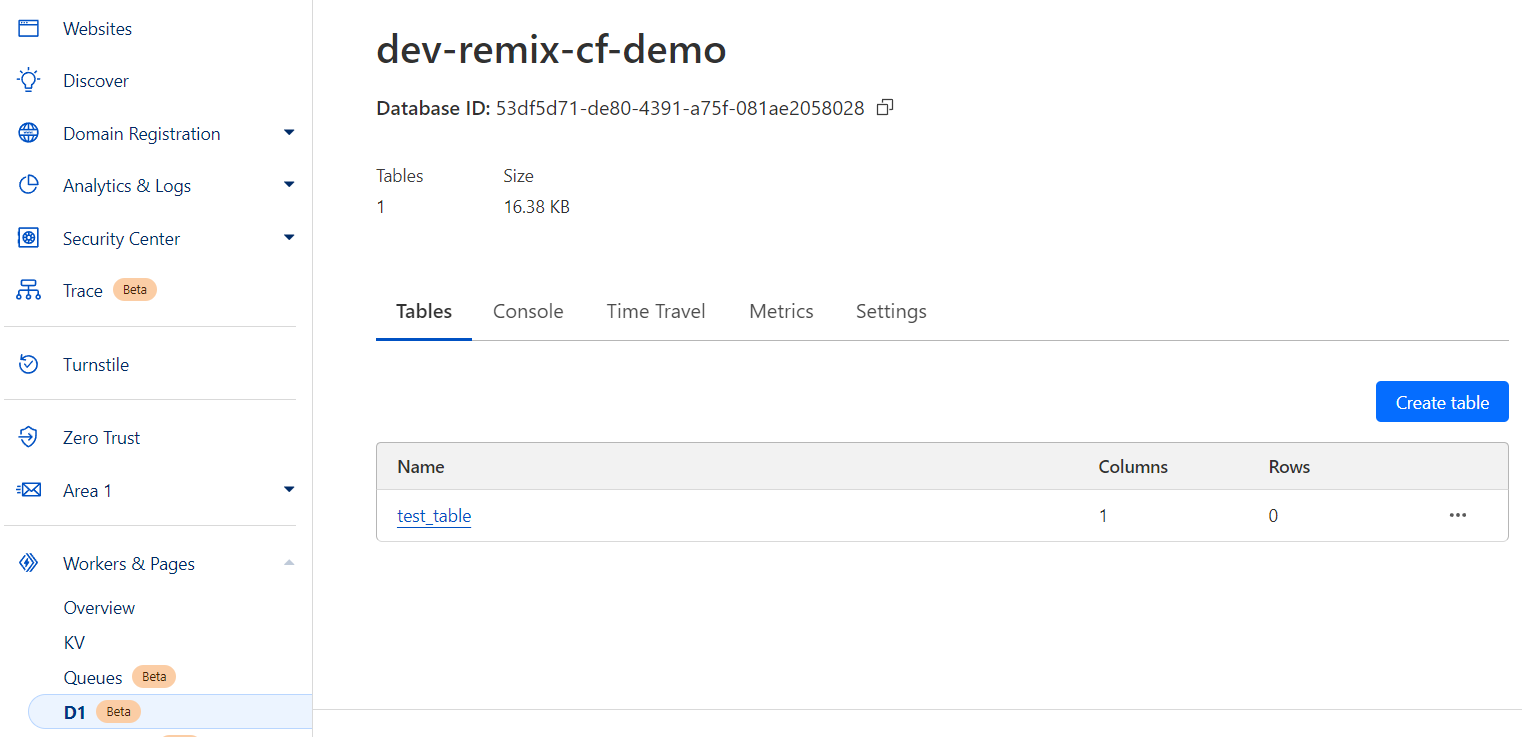
Even though we created tables and some data locally, the remote D1 database still has no tables or data. To initialize them, we need to run the migrations without the --local flag:
npx wrangler d1 execute dev-remix-cf-demo --file=./drizzle/migrations/0000_classy_kronos.sql
If you visit your Cloudflare dashboard you should see the new tables appear:
Deploying the application
Go to Workers & Pages -> Overview and click "Create application" then go to "Pages" tab.
The simplest way from here is to push your application to a new GitHub repository and then "Connect to Git" in the Cloudflare dashboard. Everything will be taken care of automatically.
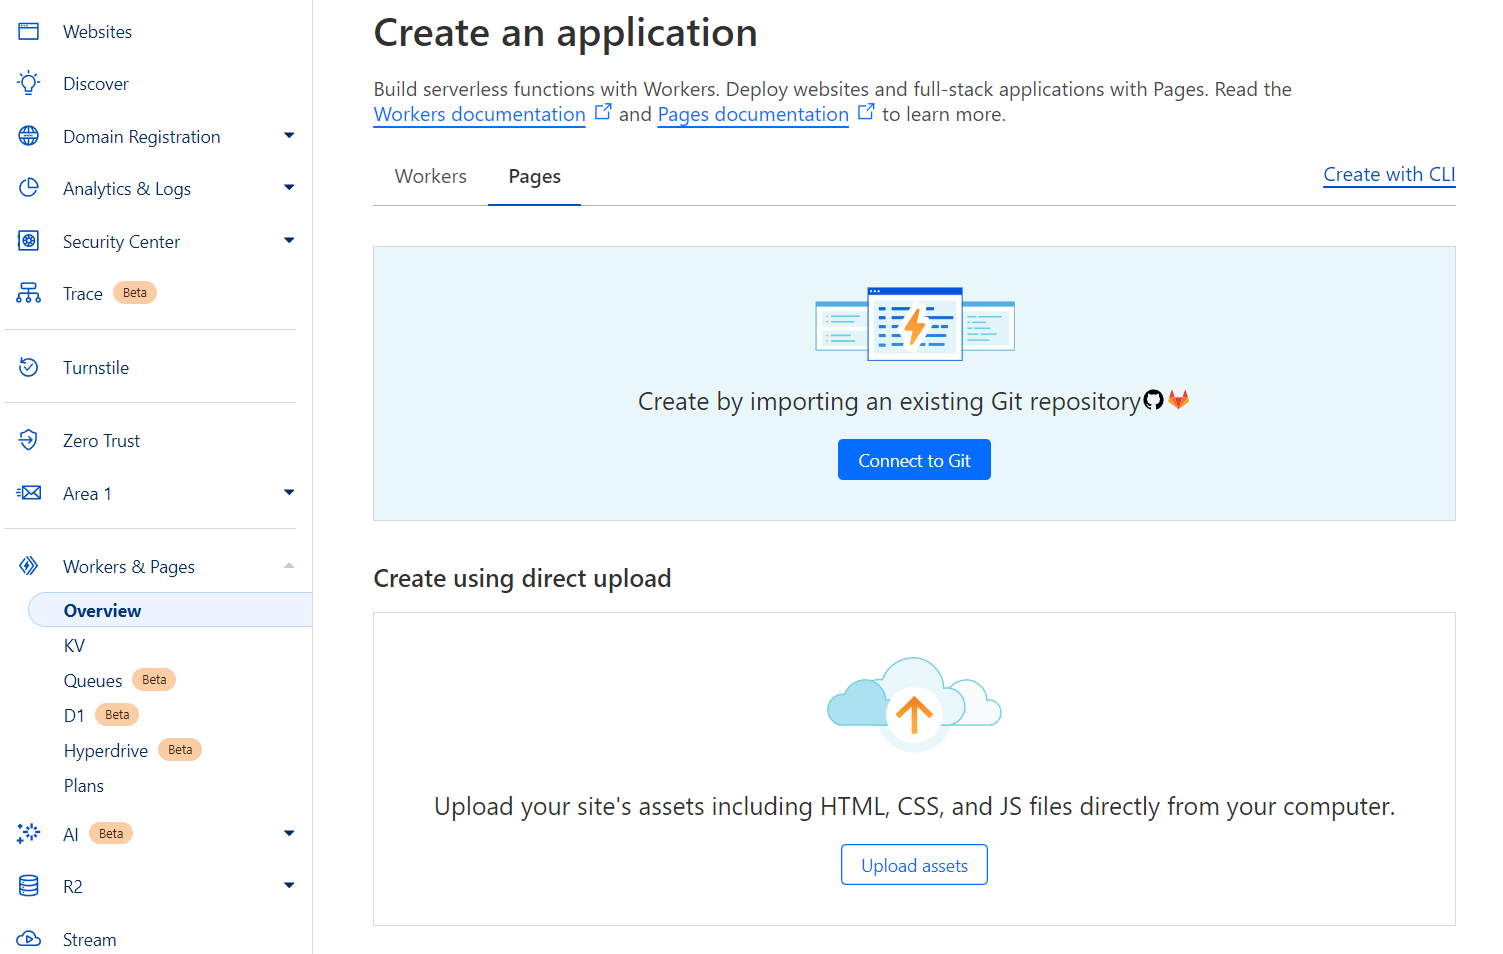
Alternatively, we can deploy through Wrangler CLI by pushing our static build files. To do that, create a new Cloudflare project first:
npx wrangler pages project create
Then, we can use wrangler pages deploy to push our static files. It is helpful to create a script in package.json for this:
"pages:deploy": "npm run build && wrangler pages deploy ./public",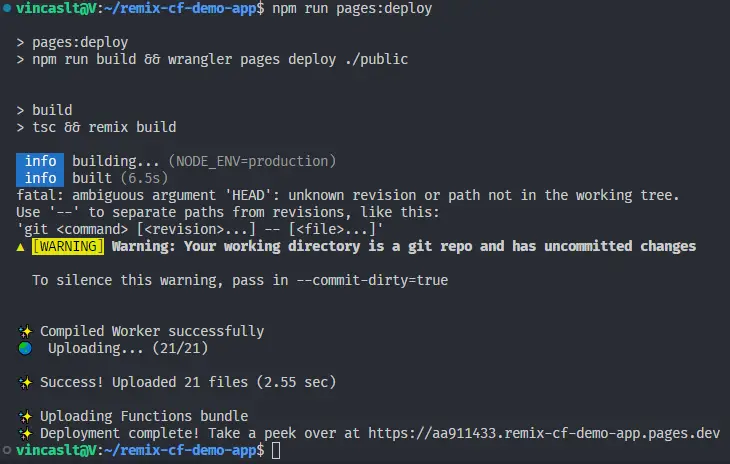
Running the command will create a new project in the Cloudflare dashboard:
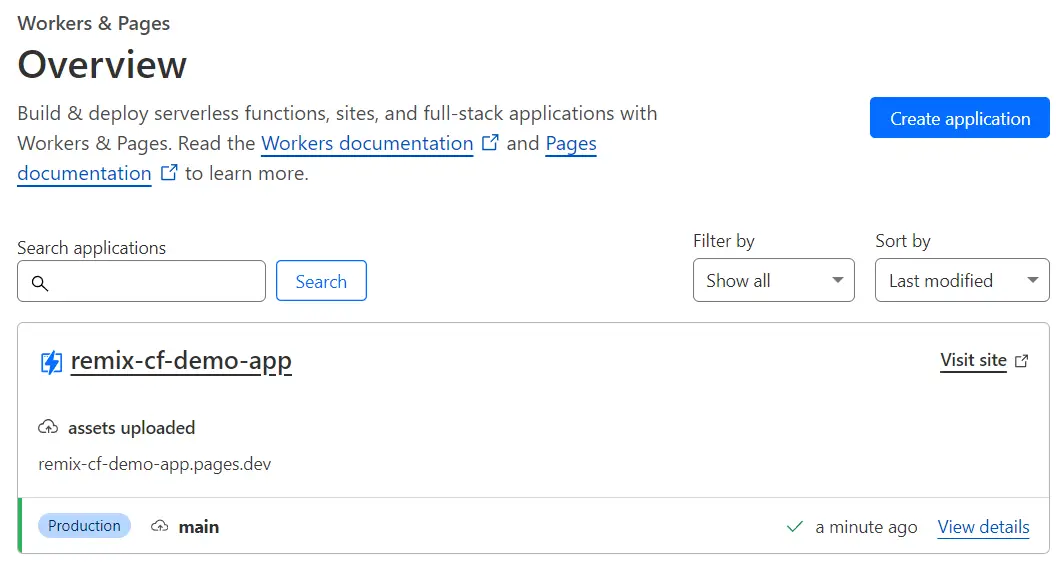
Note the application URL. We will need to set it in our environment variables.
Configure KV store and D1 bindings
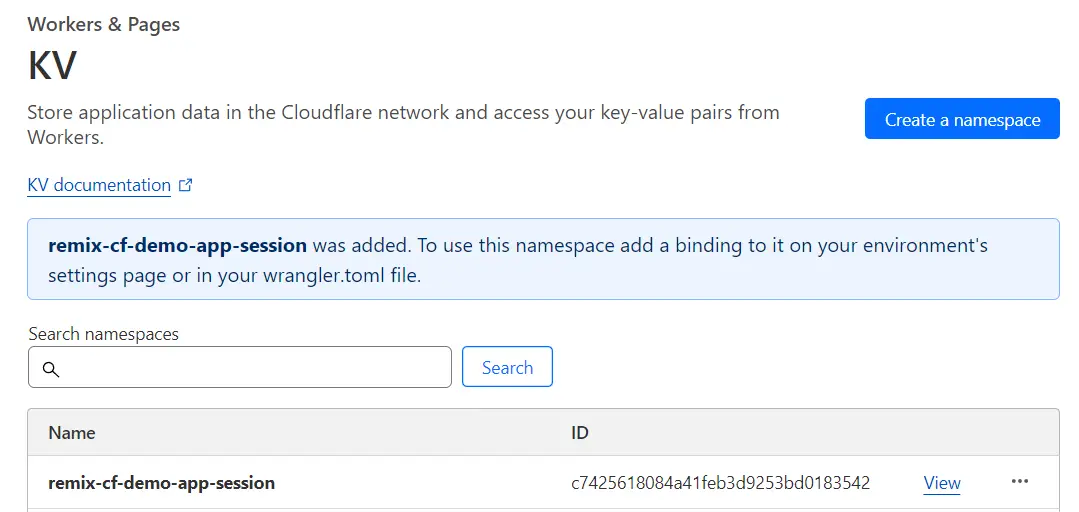
Go to "Workers & Pages" -> "KV" and "Create a namespace" with a name you'll easily identify:
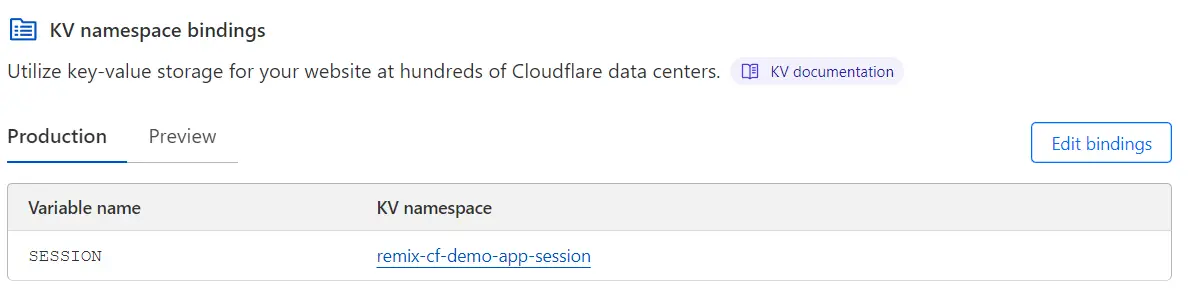
Now go to "Overview," select your app, and go to "Settings" -> "Functions." Scroll down to "KV namespace bindings" and set SESSION to the new namespace. It will be available on context.env.SESSION just like in the development environment:
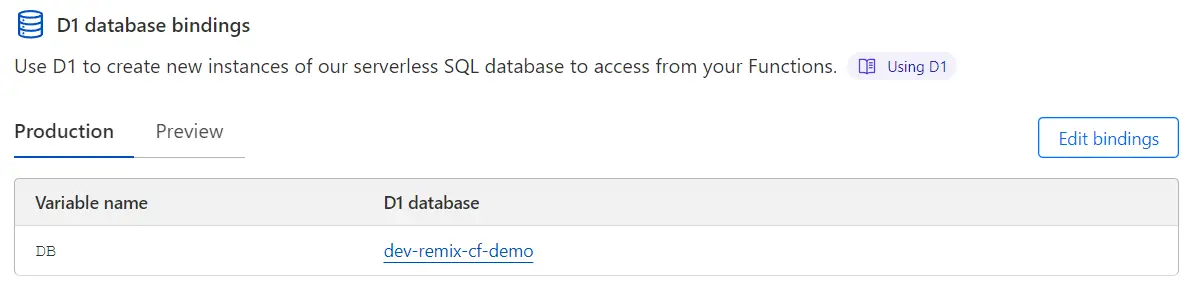
Further down below, bind your D1 database to DB variable:
Bind Shopify environment variables
As the last bit of configuration in Cloudflare, we need to add Shopify env var bindings to our pages workers.
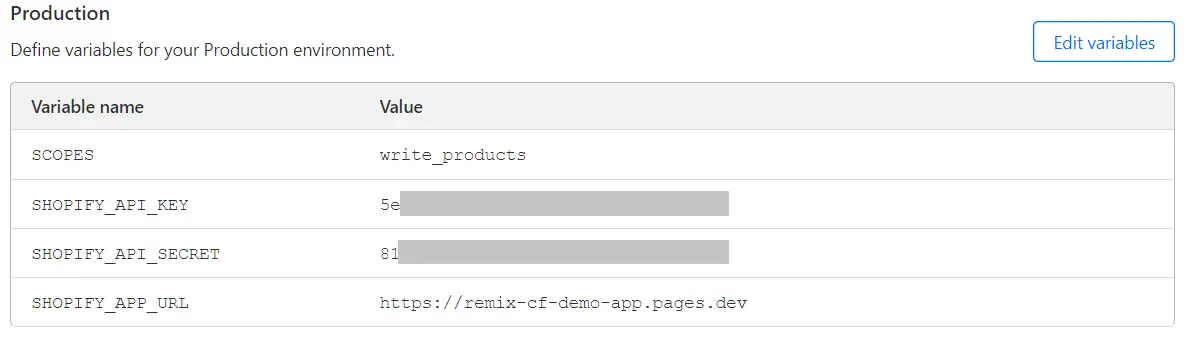
Go to your app's "Settings" -> "Environment variables" and for production environment set the variables as they are defined in .dev.vars file or run npx shopify app env show to see them in console. As SHOPIFY_APP_URL set the URL from above, with https:// prefix:
SHOPIFY_APP_URL=https://remix-cf-demo-app.pages.dev
SHOPIFY_API_KEY=abcd12345...
SHOPIFY_API_SECRET=abcd12345...
SCOPES=write_products
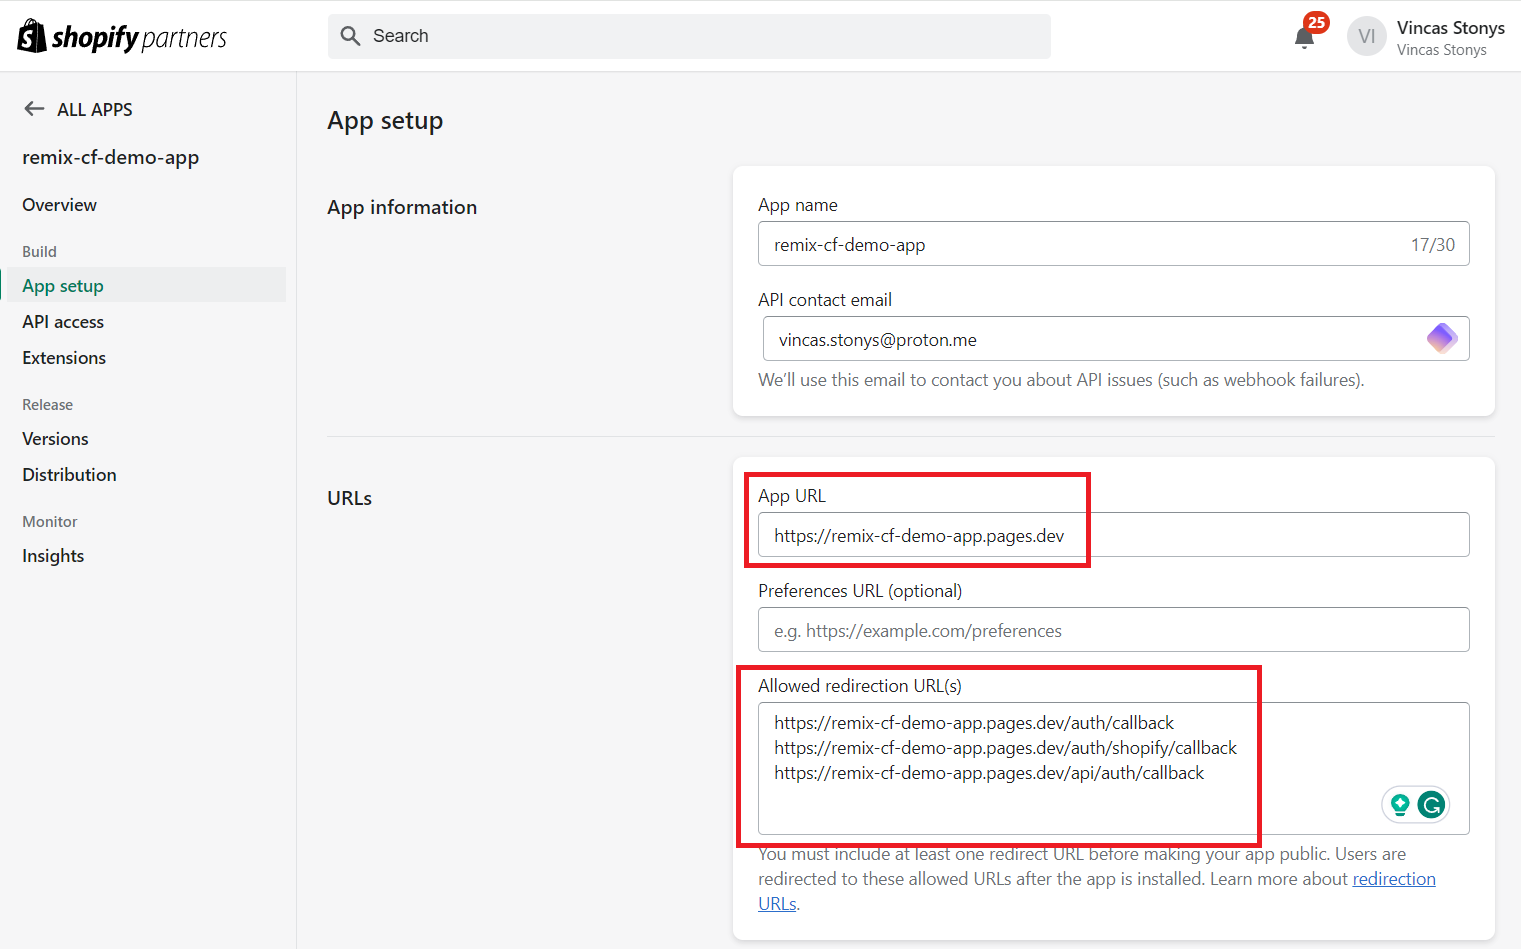
Change app URLs in Shopify partner dashboard
Finally, we need to update our app settings in the partner dashboard. Change the app URL and callback URLs to use the new Cloudflare pages URL:
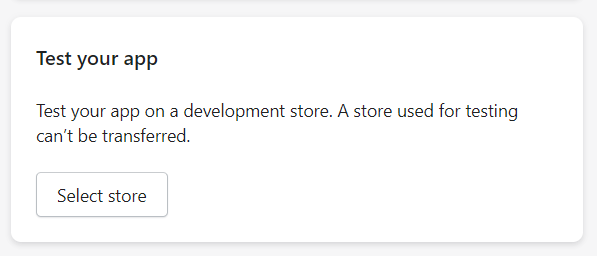
If we re-deploy the application by running npm run pages:deploy we should be able to see the production version of our application.
In your dashboard's overview page click on "Select store" which will let you install the production app on your development store:
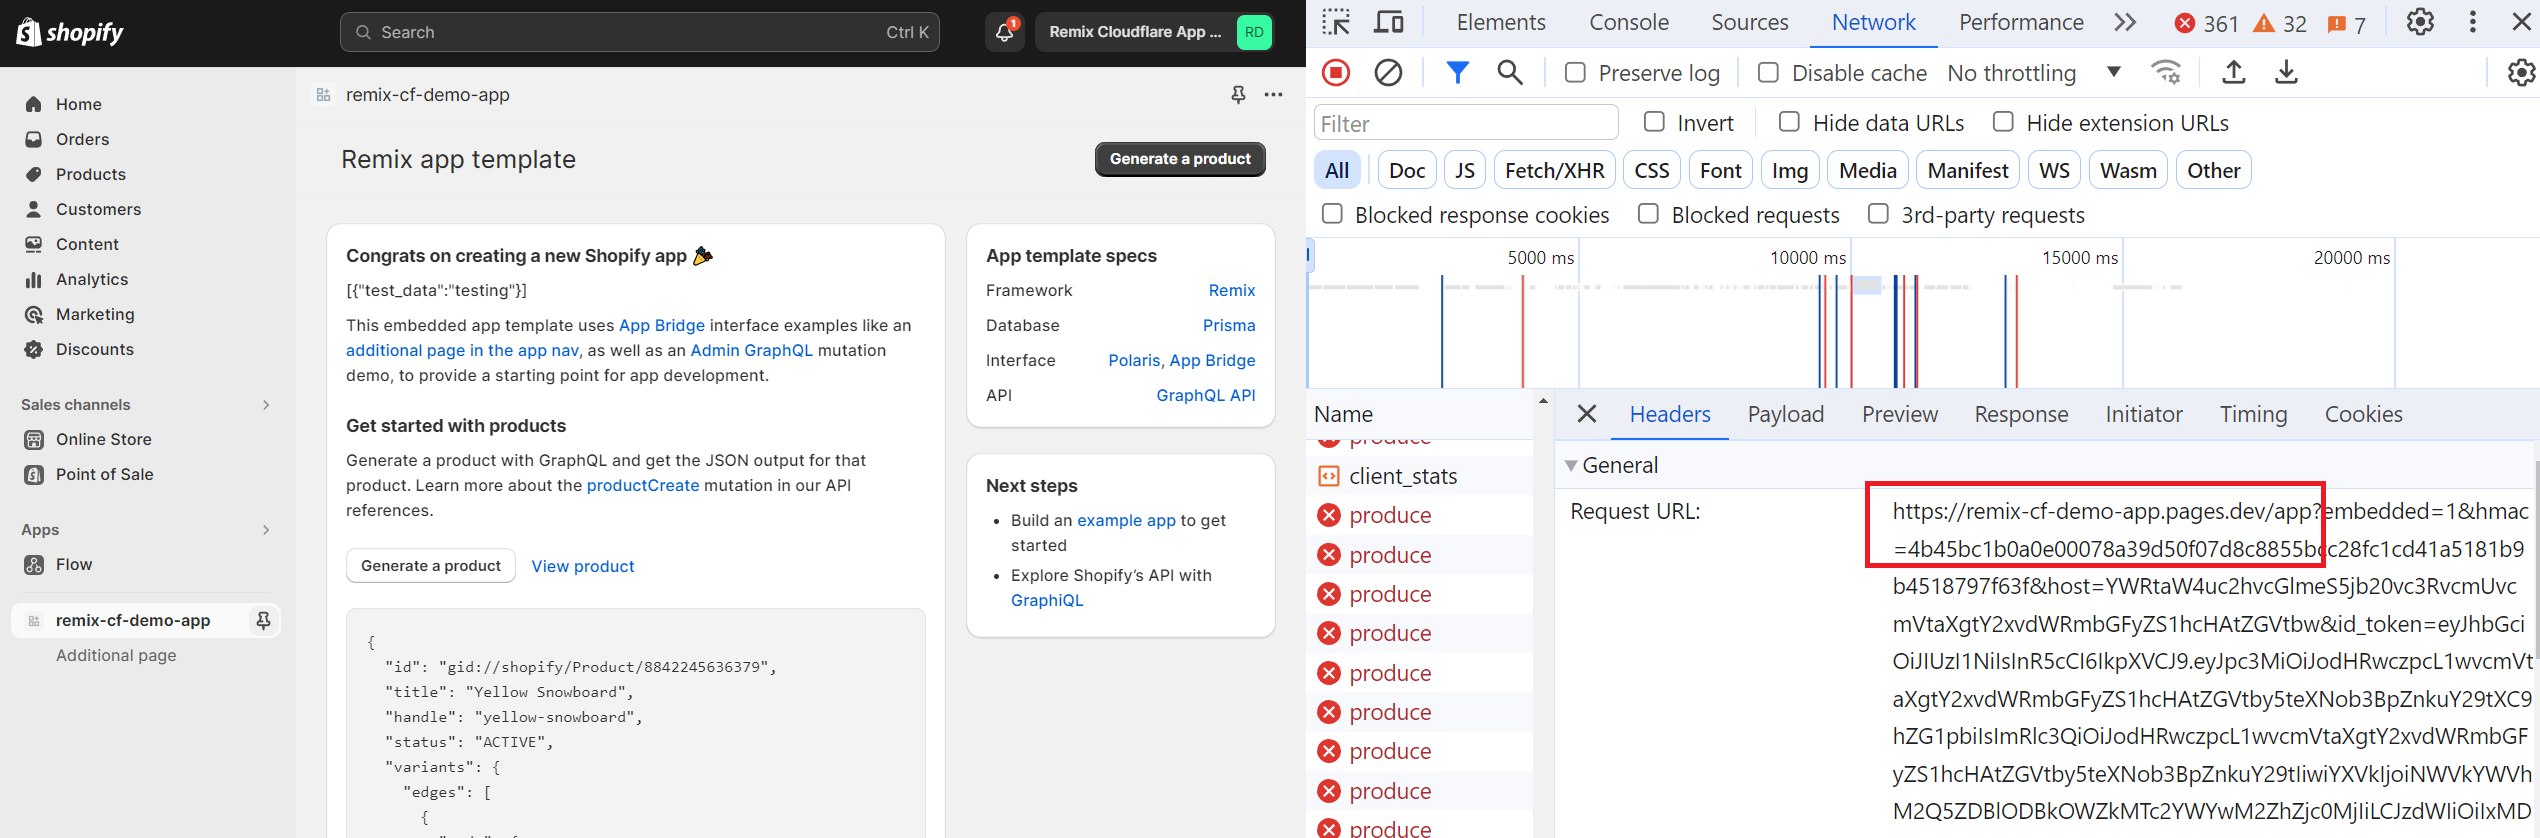
And if we test it in our development store, you'll see the requests going to the production URLs:
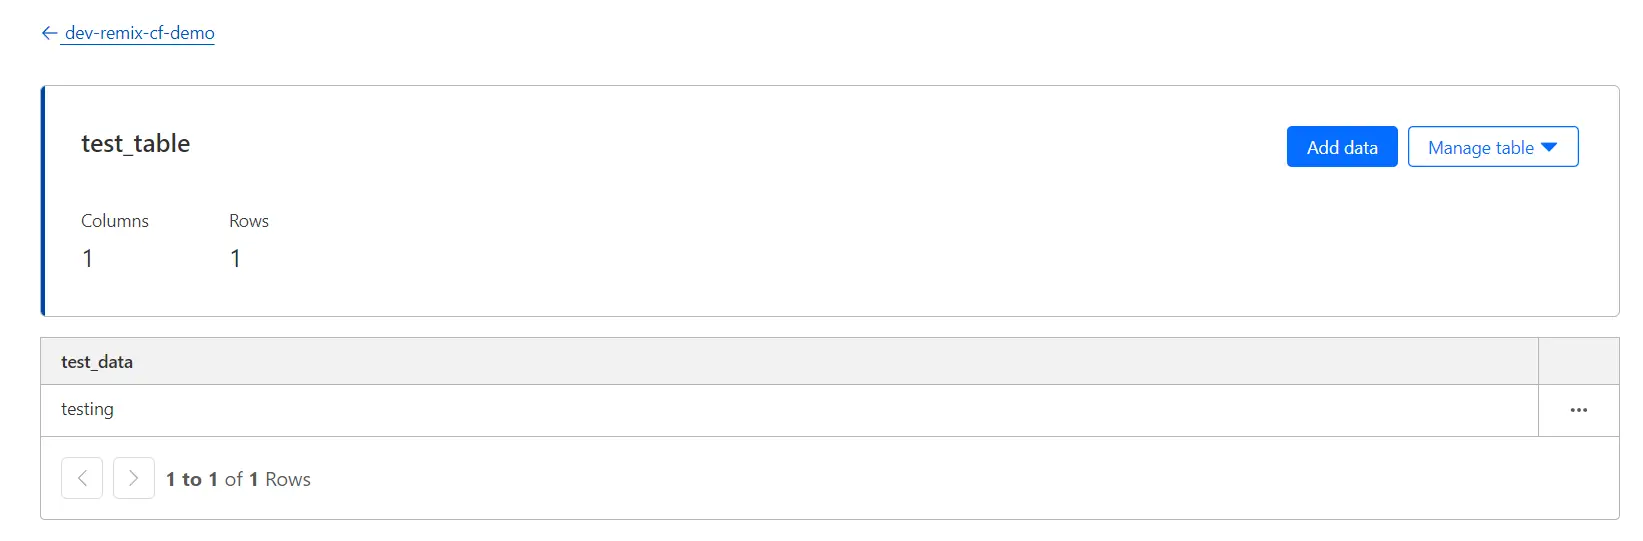
We can also verify that the production database is being used in our Cloudflare dashboard's D1 section:
Final cleanup
Now that we're not using prisma anymore, we can uninstall the related packages and remove prisma directory.
We won't be deploying containers, so we can remove docker files.
Also, because we're changing the .dev.vars file automatically, we can add it to .gitignore and ignore our new build paths:
node_modules

/.cache
/functions/\[\[path\]\].js
/functions/\[\[path\]\].js.map
/functions/metafile.*
/functions/version.txt
/public/build
.dev.vars
./.gitignoreTemplate Repository
Setting up Shopify app development is tricky without instructions. This article should help. I've also created a repository for the template with all of the code from the article here: https://github.com/vincaslt/remix-cf-pages-d1-drizzle-shopify-app